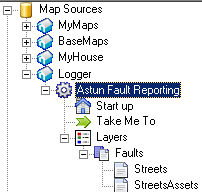
Logger Fault Layers
First click on the Layers node under the Logger node and create a Faults Layer Group. Now you need to define the Layers that you wish to include as your Fault layers. To add a new Layer right click on the Layer Group icon  and select Add New Layer or click on an existing Layer entry to change its details.
If you wish to display an asset layer then each asset layer you will need a LAYER section which should be given the same name as the faults layer but with the suffix 'Assets' and should appear directly BELOW the faults layer in the Layer group's layer list - see screenshot below. You may use the Explorer Context menu to right click and move layers up and down in the Layer Group.
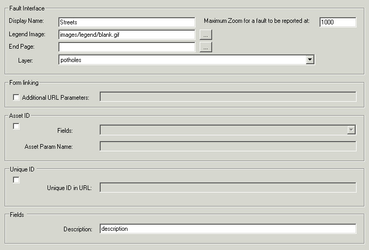
Fault Interface
Display Name
This is the name to display for the Layer in the layer selection.
Maximum Zoom for a fault to be reported at
This entry allows you to set a maximum zoom level at which a citizen can report a fault. This will determine the accuracy of the returned easting and northing coordinates.
End Page
Only used by the legacy integration with online e-forms.
Layer
This is the layer that is used to plot information on the map about the particular fault type. If you are using an Asset ID it shows the locations of the asset e.g. street lights. This could also be used to show previously reported faults.
Form Linking
Additional URL Parameters
Only used by the legacy integration with online e-forms.
Asset ID
Fields
Here we select the field that represents the Asset ID to be used for fault reporting.
Asset Param Name
Only used by the legacy integration with online e-forms.
Unique ID
Unique ID in URL
Only used by the legacy integration with online e-forms.
Fields
Description
If there is a field that you would like to use as a Description field then enter the name here.