Feature Editing from V5.8.0
5.8.0+
Enter Feature Editing mode
In order to display the Feature Editing for a selected Layer you will need to select the Edit Features icon  from the available Actions for the Layer
  .
.
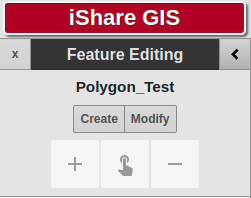
Mode Selection
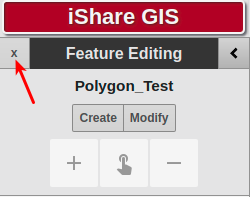
Select Create to create a new feature from scratch or Modify to edit or delete an existing feature. To exit Feature Editing altogether, select the X button above left. Once you have selected the mode the Add, Feature Builder & Remove buttons will be enabled depending upon the type of geometry.
At present there is limited support for multi-point and multi-line layers. You may create and modify the:
- geometry of a single feature
- attributes of the feature
Creating a New Feature
Step 1 - Create the Geometry
All of the geometry types support manual drawing but only Polygon or Multi-Polygon are supported by Feature Builder. The following defines how to manually draw geometry, please see the Feature Builder topic on how to create polygon geometry based on the underlying OS MasterMap data.
Point Geometry
Click Create and select the Add (+) button. Now click on the map at the desired location.
Point geometries can be moved by clicking and dragging.
To remove a point select the Remove (-) button and click on the point to be removed.
Line Geometry
Click Create and select the Add (+) button. Now click on the map at various points to define the shape of the line then double click to end. Alternatively hold Shift and move the mouse freehand, then double click to end.
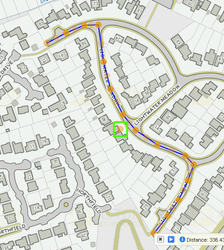
To move an entire line you need to find the node near the middle of the feature and drag it to a new position - see the node outlined in green in the diagram below. You can also drag existing nodes or mid-point nodes to new locations.
To remove a line select the Remove (-) button and click on the line to be removed.
Polygon Geometry
Click Create and select the Add (+) button. Now click on the map at various points to define the polygon boundary, then double click to end. Alternatively hold Shift and move the mouse freehand, then double click to end. Please see the Feature Builder topic on how to create polygon geometry base on the underlying OS MasterMap data.
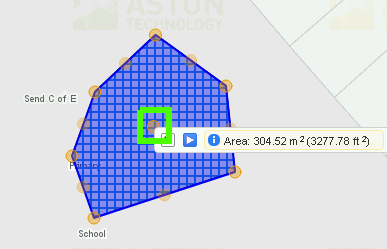
You can modify polygons by dragging the points that define the boundary. To move an entire polygon feature you need to find the node near the middle of the feature and drag it to a new position - see the node outlined in green in the diagram below.
To remove a polygon click the Remove (-) button and then click on the polygon to be removed.
Step 2 - Enter the attributes for the feature
e.g.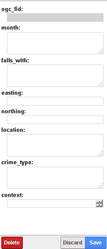
Step 3 - Save your new Feature
Click on the Save button to save your new feature. If you want to start again without saving, select Discard.

Modifying an Existing Feature
Step 1 - Select the feature that you wish to modify on the map
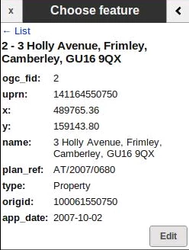
Once you have selected the feature that you wish to modify by clicking on it on the map the point, line or polygon feature will be highlighted and the contents of the individual fields displayed in the left hand Feature Editing panel.
If you should select more than one feature then you will be asked to Choose feature by clicking the Edit button of the entry you wish to edit. If you are not sure which you want either hover over the Details link and the feature will be highlighted on the map or click on the link to display more feature details. e.g.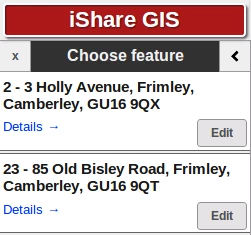
If you would like to see a name / description for a feature in the Choose feature list - see the Address in the above example - then you will need to have specific field names in your layer.
The unique field will always be added to the title (which is usually the ogc_fid)
If you want certain information to be added to the title, the field name should be called either name, nam or title (or a combination thereof)
You can add a description field by having one or more fields called (description, desc or descriptio)
Step 2 – Edit the feature data or attributes
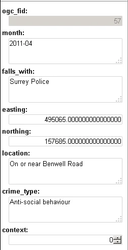
If you wish to change the data or attributes of your feature this can be done by simply over-typing or select new entries in the boxes provided e.g.
Step 3 - Edit the geometry
If you wish to edit the geometry of your feature this can be done in the same way as creating the geometry in the first place - see Create the Geometry above.
Step 4 – Save your changes
Click on the Save button to save your new feature. If you want to cancel your changes, select Discard.
Deleting an existing Feature
First you need to select the Feature that you wish to delete from the map. As with editing, if you should select more than one feature then you will be asked to Choose feature by clicking the Edit button of the entry you wish to edit.
Once you are happy that you have chosen the correct Feature, click the Delete Feature button at the bottom of the Feature Editing panel and your feature will be instantly deleted.
Exit Feature Editing mode
To end Feature Editing click on the small cross to the left of the Feature Editing heading e.g.
If you exit Feature Editing without saving any changes that you have made to the layer will be discarded.