Implement SSO for iShare GIS with Azure AD
Contents
1. Setup Azure AD (customer task)
In order to access iShare GIS using users from Azure with Azure's SSO (Single Sign On) it must be setup as an application for an Azure Active Directory (AD) and configured to authenticate those users using SAML (Security Assertion Markup Language).
Note: Currently 'pure Azure' scenarios cannot make use of group membership to map to iShare Roles. As per: https://docs.microsoft.com/en-us/azure/active-directory/hybrid/how-to-connect-fed-group-claims - only the group ID can be used in a Claim for Azure groups; the name can only be passed across from groups synchronized with on-premises Active Directory.
1.1 Create application for iShare GIS in Azure
Before starting
You will need:
An Azure account with Azure Active Directory, either
- wholly hosted in Azure, or
a hybrid environment with an on-premises Active Directory using AD Connect with Azure
- A subscription for the account that enables the creation of Self-Service App Integration templates - currently (July 2019) a Premium P1 subscription or higher
Groups in Active Directory that correspond to Roles to use in iShare GIS
Users in Active Directory that are members of those Groups
- Licences assigned to these Users (either directly or through Groups) that allow use of Self-Service App Integration templates - again a Premium P1 or higher will do this
- An Azure user that has permission to configure applications in Azure Active Directory
ISHARE GIS URI: The URI that end-users use to run iShare GIS
The synchronized Active Directory and concomitant Users and Groups are required if iShare GIS Roles need to be used.
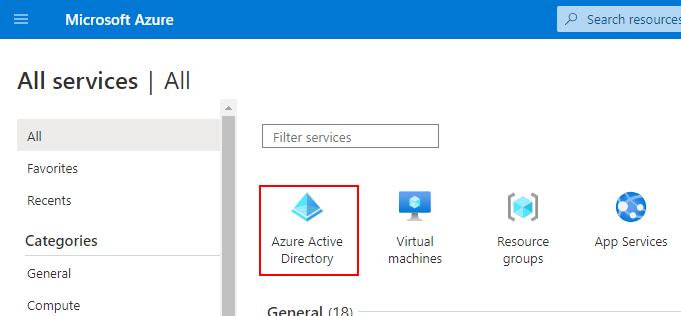
(a) Login to Azure with the Azure user, then select Azure Active Directory.
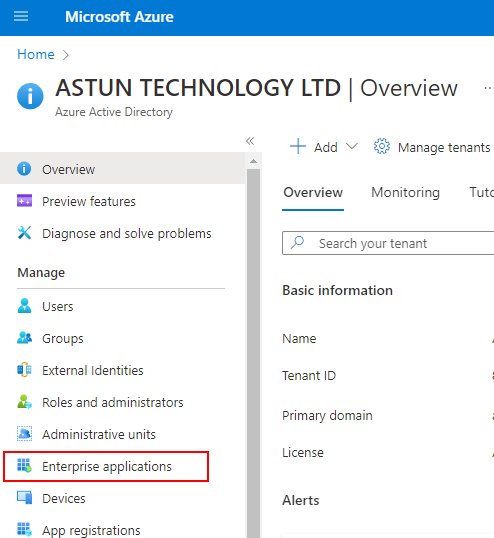
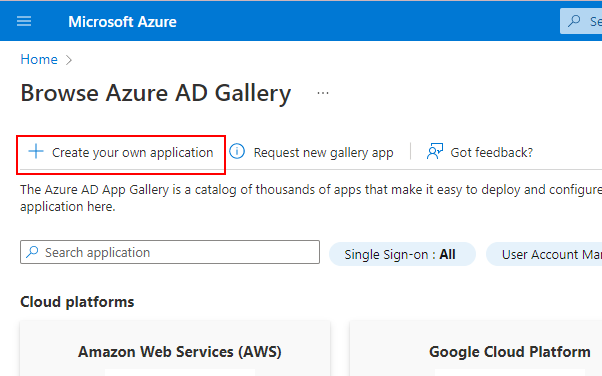
(c) Locate and select New application.
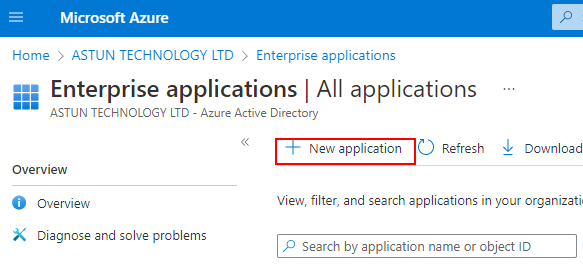
(d) Select Create your own application.
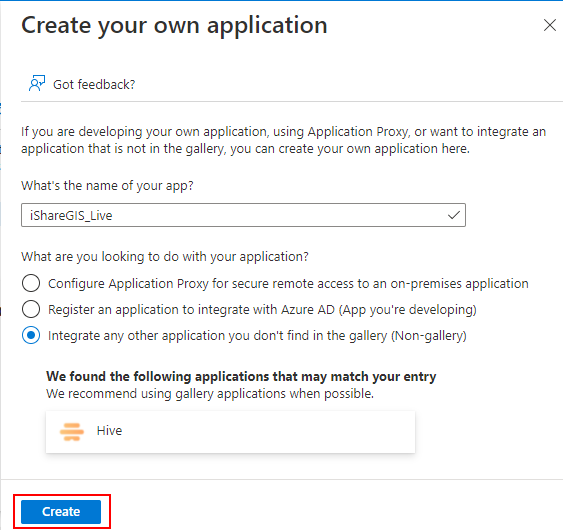
iShareGIS_Live) and select the default radio button Integrate any other application you don't find in the gallery (Non-gallery).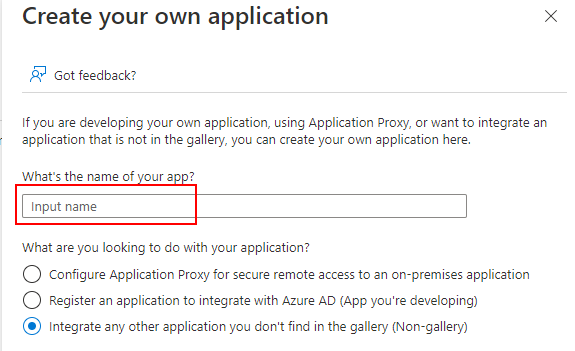
(f) Select Create.
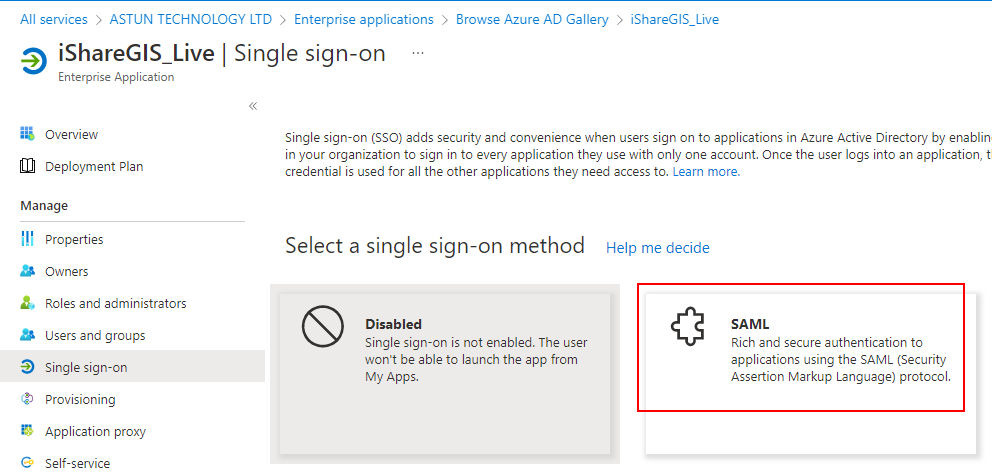
(g) In the next screen, the application overview (e.g. iShareGIS_Live - Overview), select Single sign-on.
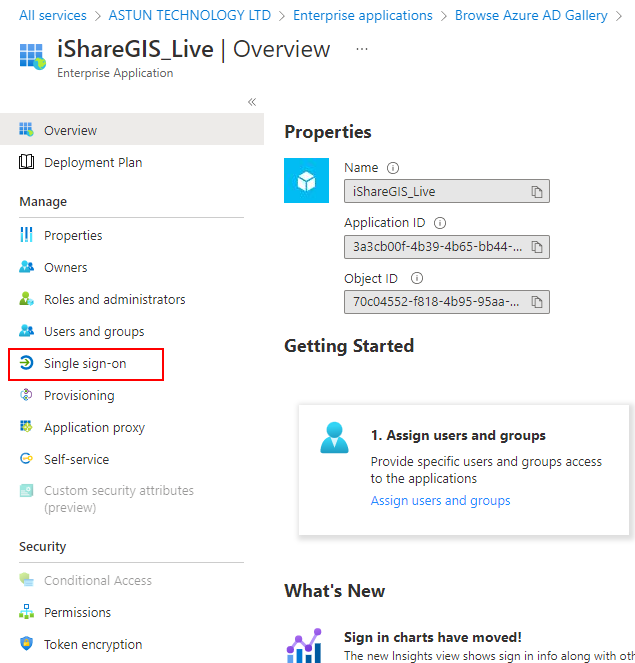
(h) From the options then provided, select SAML.
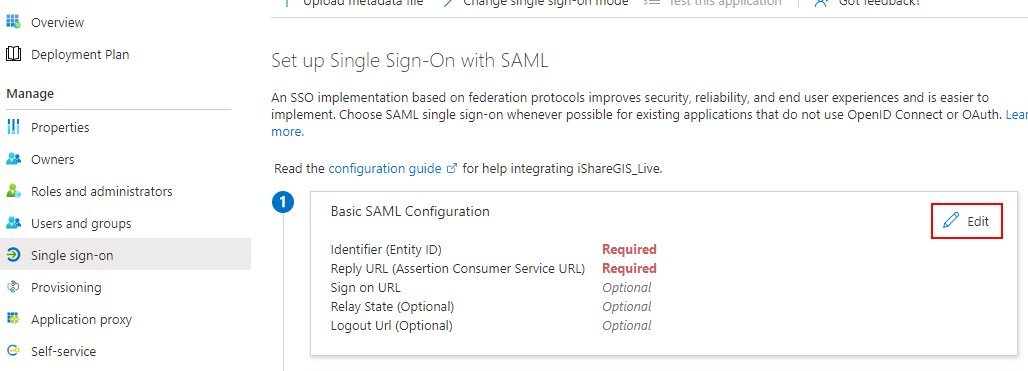
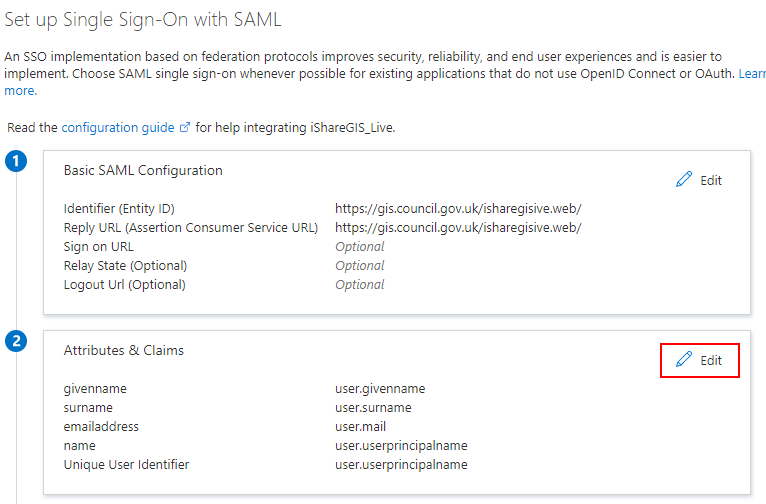
(i) The Set up Single Sign On with SAML screen should then be shown. Choose the Edit button in the first panel (Basic SAML Configuration).
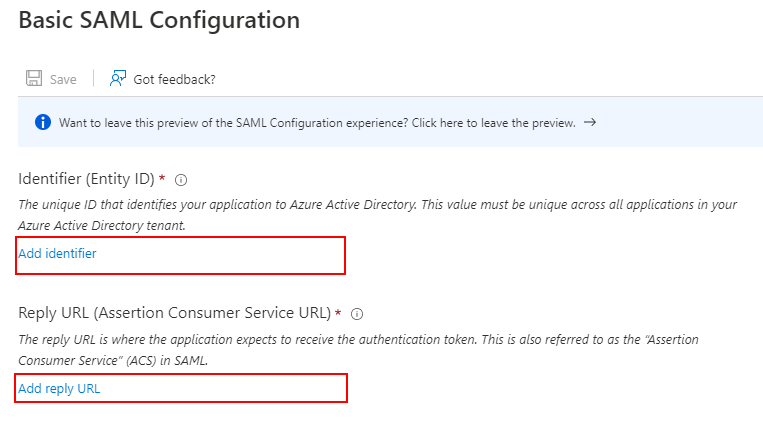
(j) For both Identifier (Entity ID) and Reply URL (Assertion Consumer Service URL) enter the ISHARE GIS URI. Click Add identifier to add the URL to both entries.
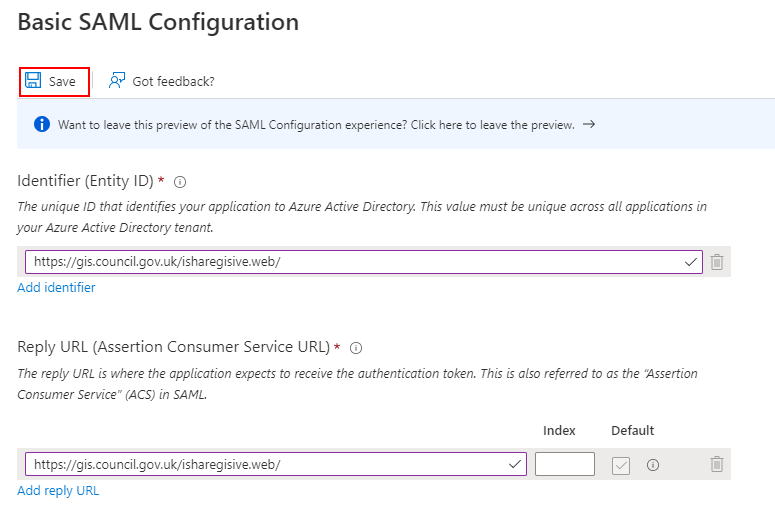
(k) Once the URI has been entered in both places, select Save.
1.2 Add Groups as Role Claims
This section can be skipped if access to Map Sources is not going to be managed through iShare GIS Roles.
Any user that is authenticated will have access to iShare GIS with basic permissions. For enhanced permissions such as read / write access to sensitive data iShare GIS uses the concept of Roles. These roles are tied to Active Directory (AD) group membership. These group memberships are passed to iShare GIS via Azure AD as Role Claims. The AD Groups correspond to Windows groups on the iShare GIS server, which in turn are mapped to Roles using iShare Studio (see: Roles & User Authentication in the iShare help documentation).
There are two approaches to take.
- The first approach is to Assign Groups to the Application. This method requires some maintenance if new groups need to be added for establishing roles. The advantage is that only the groups assigned to the application are passed to iShare GIS. If there are any Active Directory groups that use ampersands or there is a likelihood that a group will be created that uses an ampersand then it is recommended to use this approach. Note: nested groups are not included and users must be direct members of groups assigned to iShare GIS.
- The second approach is to use Security Groups. This method passes all the domain groups that the user is a member of to iShare GIS. There's no maintenance effort involved. If a user is made a member of a new Active Directory group that will also be passed to iShare GIS and could be used in establishing available Roles for the user. There are a number of disadvantages. The first is that all group membership information is passed to iShare GIS and though the communication is encrypted it is certain that not all group information will be used in determining role permissions. The second disadvantage is that if there are any group names that contain an ampersand (&) iShare GIS will not be able to establish roles. Either rename groups that contain ampersands or use the second approach. Also with Security Groups it is not possible to create a rule to pass a filtered set of groups say based on an 'iShareGIS_' prefix.
Approach 1: Add Groups as Role Claims using Groups assigned to the Application
Note: This is the preferred approach and follows Microsoft's own guidance, but there is an alternative Approach 2 - Add groups as Role Claims using Security Groups. The two methods are mutually exclusive.
Open Enterprise Applications. Select iShare GIS from the list. Select Single Sign On configuration. Select User Attributes & Claims.
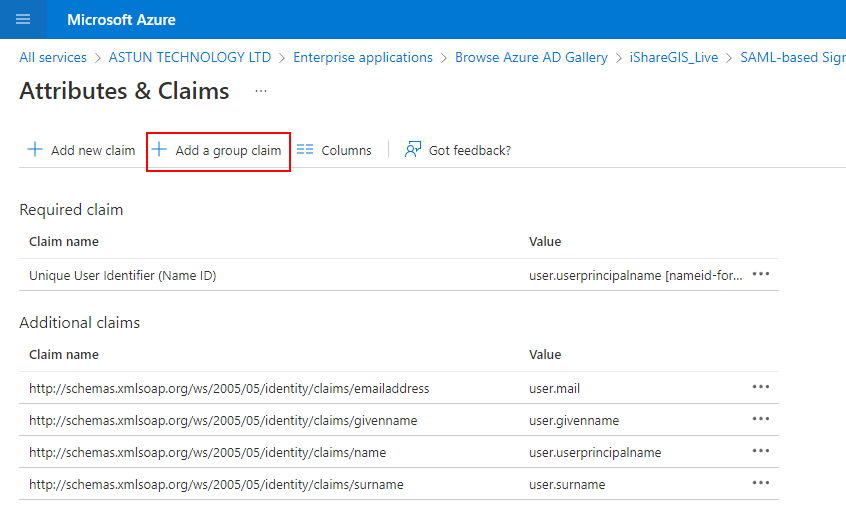
Click on Add a group claim.
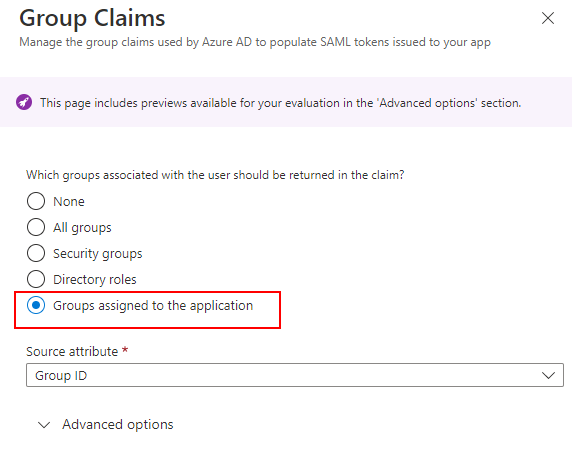
Select 'Groups assigned to the application' from the Group Claims dialog.
To change the groups assigned to iShare GIS, select the iShare GIS application from the Enterprise Applications list and then click Users and groups from the application's left-hand navigation menu. Then select Add user/group.
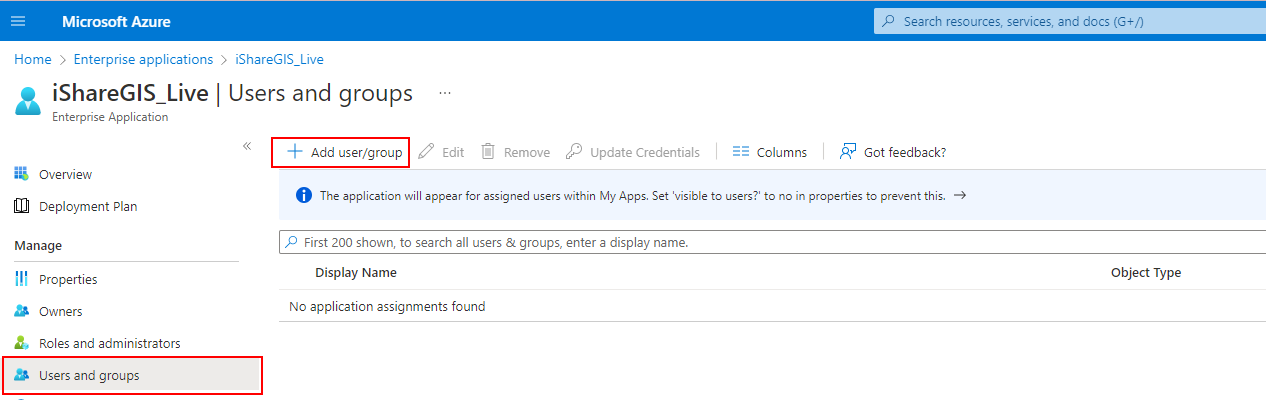
Groups can then be added by selecting 'Add user/group'.
Approach 2: Add groups as Role Claims using Security Groups
Note: The preferred method is to use Approach 1 - Add Groups as Role Claims using Groups assigned to the Application. The two methods are mutually exclusive.
(a) From the Set up Single Sign-On with SAML screen, select the Edit button in the Attributes & Claims pane.
(b) Once at the Attributes & Claims screen, select the Add a group claim.
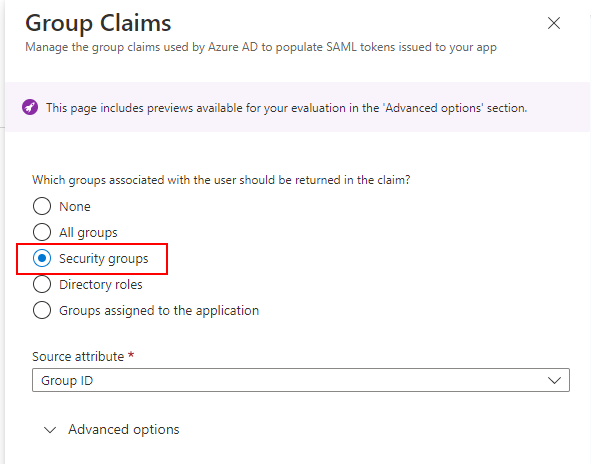
(c) The Group Claims screen is then displayed. Here, select Security groups from the list for Which groups associated with the user should be returned in the claim.
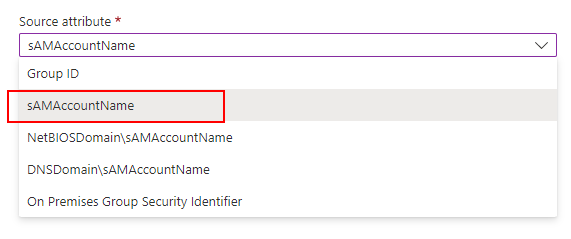
(d) Next, select sAMAccountName for Source attribute. (iShare GIS will not understand any of the other values.)
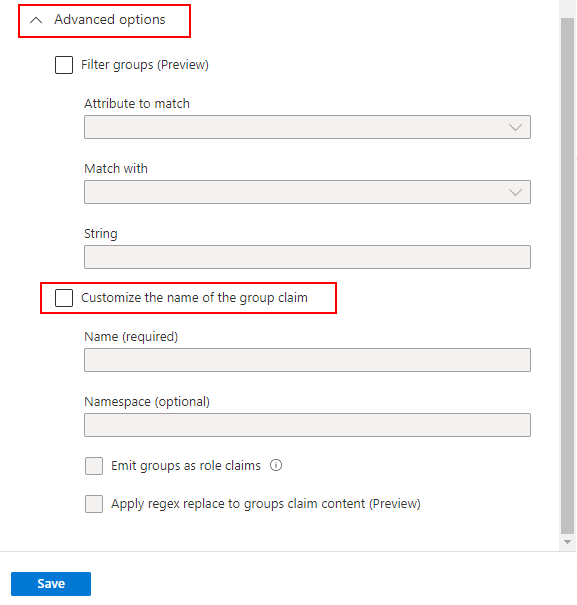
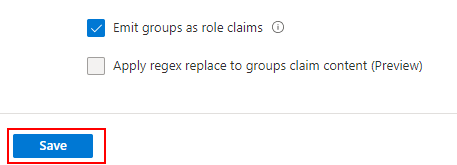
(e) Now select Customize the name of the group claim under Advanced options.
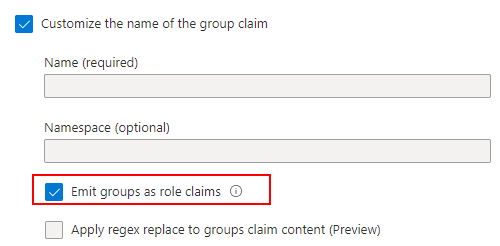
(f) Leaving the Name (required) and Namespace (optional) settings empty, select Emit groups as role claims.
(g) Select Save.
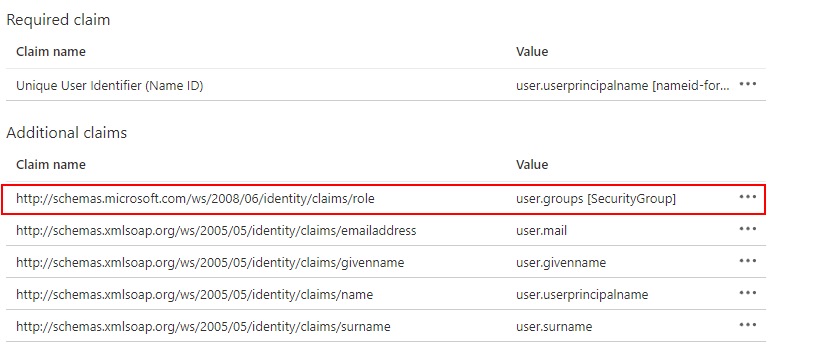
(h) On the Attributes & Claims screen
verify that under Claim name there is an entry for http://schemas.microsoft.com/ws/2008/06/identity/claims/role and that the corresponding VALUE is user.groups.
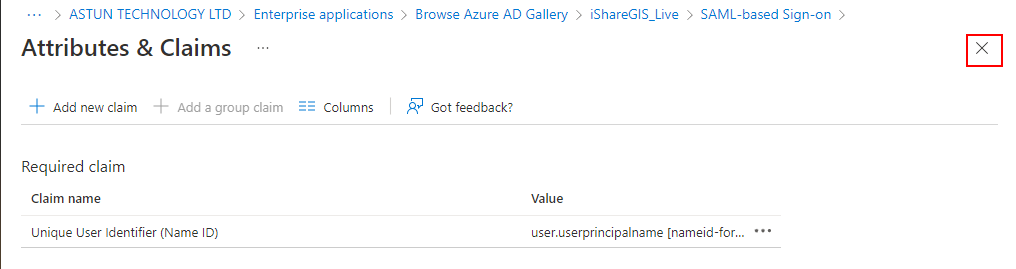
(i) Now select the Close button.
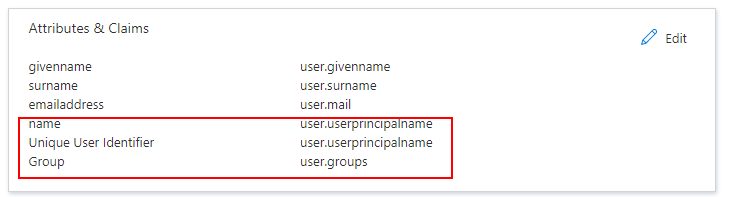
(j) The Attributes & Claims panel should now
include the following three claims: name, Unique User Identifier, and Group.
1.3 Get values for iShare GIS web application configuration
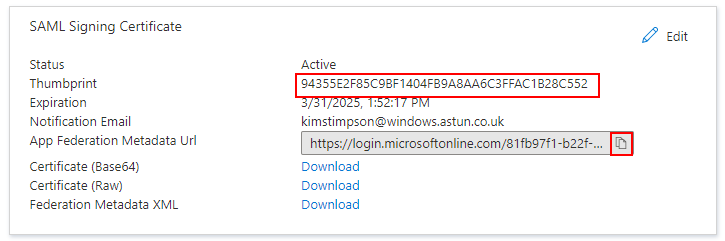
(a) Still at the Set up Single Sign-On with SAML screen, go to the SAML Signing Certificate panel, copy Thumbprint and send to the Astun consultant that will perform the iShare GIS configuration. Then select the Copy to clipboard button for App Federation Metadata Url, also send this to the Astun consultant performing the iShare GIS configuration.
2. iShare GIS Configuration (Astun task)
iShare GIS does not deal with the Single Sign-On authentication directly, instead it makes use of the Microsoft Windows Identity Framework (WIF). WIF handles the token exchange, claims, etc. and then passes the authenticated identity's details to iShare. This means that the configuration is not done in the usual way, through iShare Studio, but instead WIF must be configured independently through the Web applications web.config file.
(a) First, ensure that Windows Identity Foundation 3.5 is installed. If the server was one previously using ADFS (or similar SAML authentication like Okta) then this will be present already - skip to step (b). Otherwise:
- Open Server Manager.
- Under Manage menu, select Add Roles and Features
- Click Next until the Features screen is reached
- On the Features screen, select Windows Identity Foundation 3.5 and click Next
- Under Confirmation click Install
- Wait for the installation to complete, then click Close
Ensure that Windows Authentication is disabled, and Anonymous Authentication is enabled in the iShare GIS site/application under IIS.
Under the Advanced Settings of the application pool used by the Web application set Load User Profile = True.
(c) Before configuring the iShare GIS web application for use with Azure Active Directory Single Sign-On, ensure the following are known:
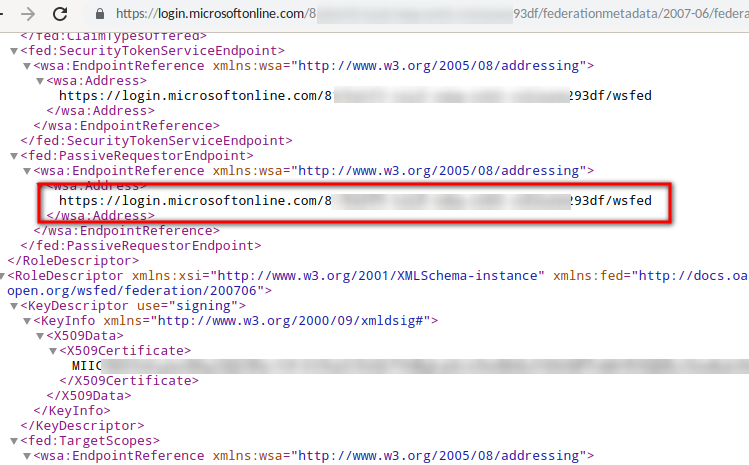
ISHARE GIS URI- the URI for the iShare GIS Web applicationFEDERATION METADATA URI- from Azure Active Directory Enterprise Application setup (see above)CERTIFICATE THUMBPRINT- from Azure Active Directory Enterprise Application setup (see above)CERTIFICATE NAME- this can be anythingPASSIVE REQUESTER ENDPOINT- from the previous stepCERTIFICATE EXPIRY DATE- for our Support Calendar
In the Web folder for the iShare GIS Web application, open the web.config file for editing - this will normally be in D:\Astun\iShareGIS\LIVE\WebApps\Web. It should already be configured for normal operation of iShare GIS. Add, update, or ensure the existence of the settings in the following example (only those settings relevant to Windows Identity Framework & SAML setup are shown):
<?xml version="1.0" encoding="utf-8"?>
<configuration>
  <configSections>
    <section name="microsoft.identityModel" type="Microsoft.IdentityModel.Configuration.MicrosoftIdentityModelSection, Microsoft.IdentityModel, Version=3.5.0.0, Culture=neutral, PublicKeyToken=31bf3856ad364e35" />
  </configSections>
  <appSettings>
	...
    <add key="FederationMetadataLocation" value="[FEDERATION METADATA URI]" />
  </appSettings>
  <location path="FederationMetadata">
    <system.web>
      <authorization>
        <allow users="*" />
      </authorization>
    </system.web>
  </location>
  <system.web>
	...
    <authorization>
      <deny users="?" />
    </authorization>
    <authentication mode="None" />
	...
  </system.web>
	...
  <system.webServer>
    ...
    <modules>
      ...
      <add name="ClaimsPrincipalHttpModule" type="Microsoft.IdentityModel.Web.ClaimsPrincipalHttpModule, Microsoft.IdentityModel, Version=3.5.0.0, Culture=neutral, PublicKeyToken=31bf3856ad364e35" preCondition="managedHandler" />
      <add name="WSFederationAuthenticationModule" type="Microsoft.IdentityModel.Web.WSFederationAuthenticationModule, Microsoft.IdentityModel, Version=3.5.0.0, Culture=neutral, PublicKeyToken=31bf3856ad364e35" preCondition="managedHandler" />
      <add name="SessionAuthenticationModule" type="Microsoft.IdentityModel.Web.SessionAuthenticationModule, Microsoft.IdentityModel, Version=3.5.0.0, Culture=neutral, PublicKeyToken=31bf3856ad364e35" preCondition="managedHandler" />
	  ...
    </modules>
    ...
  </system.webServer>
  <microsoft.identityModel>
    <service>
      <audienceUris>
        <add value="[ISHARE GIS URI]" />
      </audienceUris>
      <federatedAuthentication>
        <wsFederation passiveRedirectEnabled="true" issuer="[PASSIVE REQUESTER ENDPOINT]" realm="[ISHARE GIS URI]" requireHttps="true" />
      </federatedAuthentication>
      <certificateValidation certificateValidationMode="None" />
      <applicationService>
        <claimTypeRequired>
          <claimType type="http://schemas.xmlsoap.org/ws/2005/05/identity/claims/name" optional="true" />
          <claimType type="http://schemas.microsoft.com/ws/2008/06/identity/claims/role" optional="true" />
        </claimTypeRequired>
      </applicationService>
      <issuerNameRegistry type="Microsoft.IdentityModel.Tokens.ConfigurationBasedIssuerNameRegistry, Microsoft.IdentityModel, Version=3.5.0.0, Culture=neutral, PublicKeyToken=31bf3856ad364e35">
        <trustedIssuers>
          <add thumbprint="[CERTIFICATE THUMBPRINT]" name="[CERTIFICATE NAME]" />
        </trustedIssuers>
      </issuerNameRegistry>
    </service>
  </microsoft.identityModel>
  ...
</configuration>
Note: <system.web> nodes appear both directly under configuration and its child <location path="FederationMetadata">. Both are needed and are configured differently (the former causes the Identity Framework authentication to kick in).
Once these changes have been made, save web.config and open the Authentication module for the site in IIS which should flag up any errors in the XML of the web.config file.
(d) Users should now be able to login to the iShare GIS Web application at ISHARE GIS URI using their domain username and password, and only see the Map Sources to which they have been granted access through the use of iShare Roles.