Create the Tasks to Download & Build the CMIS data
Step 1 - Customise Download Script
Astun supply a python script to download the CMIS data GetCMISPeople.py which connects to the CMIS SOAP web service in order to download Councillor information including their Contact details, Ward and image into a CSV file councillors.csv.
The script must be modified to specify the URL for the CMIS SOAP web service and details of any Proxy.
The IP address of the server which is running the download script will normally need to be whitelisted by CMIS in order for the URL to be accessible.
- Open the GetCMISPeople.py, which you will find in the ...Studio\config folder for your iShare installation, in a Text Editor such as Notepad++.
# The following 2 lines will need to be adjusted to suit the cmis environment
# 1. Change url = to suit
# 2. Proxy address and port may need to be adjusted, use `proxy=None` if no proxy is required

url = "https://cmis.mycouncil.gov.uk/CMIS/DesktopModules/IWebCSharp/WebService.asmx?wsdl"
proxy = dict(https='proxy2.mycouncil.gov.uk:3128', http='proxy.mycouncil.gov.uk:80')
- Edit the url and proxy details and Save you changes.
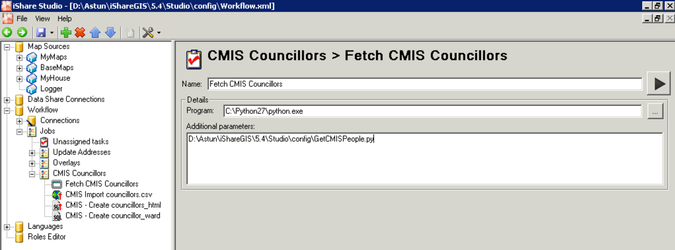
Step 2 - Create Task to Fetch CMIS Councillors
In Step 1 we customised the script to download the CMIS data and now we need to create the Task to call this script.
- In the tree, right click on the Build Councillors (CMIS) Job you have just created and select New Task.
- Select the Program type and click OK.
Name
Enter a Name for the task e.g. Fetch CMIS Councillors.
Program
Browse to the python executable e.g. c:\python27\python.exe
Additional Parameters
Here you need to enter the link to the python script to download the CMIS data e.g.
D:\Astun\iShare\Studio\config\GetCMISPeople.py
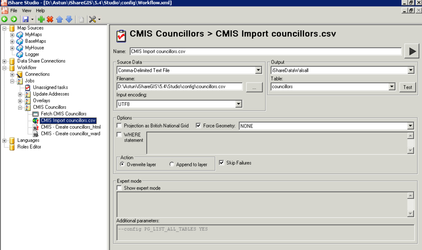
Step 3 - Create Task to Import CMIS Councillors
The Python script creates a CSV file Councillors.csv in the ...Studio\config folder, this can then be imported into the Data Share database via a Spatial Data Transformation Workflow Task.
- Right click on the Build Councillors (CMIS) Job you have just created and select New Task.
- Select the Spatial Data Transformation type and click OK.
Name
Enter a Name for the task e.g. CMIS - Import councillors.csv
Source Data
Select Comma-Delimited Text File
Filename
Enter the path to the generated councillors.csv file e.g. D:\Astun\iShareGIS\5.4\Studio\config\councillors.csv
Output
Select your Data Share database from the list e.g. iShareData
Table
Enter the name of the table that you wish to be created in the Data Share database e.g. councillors
Force Geometry
Tick the Force Geometry box and select NONE from the list.
Show expert mode
Tick the Show expert mode and then enter the following in the Additional Parameters.
--config PG_LIST_ALL_TABLES YES
The use of --config PG_LIST_ALL_TABLES YES ensures that the ogr2ogr command finds the existing councillors table in order to overwrite it if the Task is ran more than once
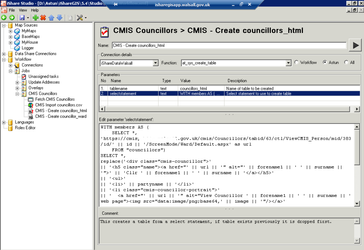
Step 4 - Create Task to add HTML column
Once the data is imported into the Data Share database a Stored Procedure Task is used to create a new table with an additional html column which will be displayed in My House. The select statement will need to be updated to specify the appropriate URL for the organisations public CMIS website.
- Right click on the Build Councillors (CMIS) Job you have just created and select New Task.
- Select the Stored Procedure type and click OK.
Name
Enter a Name for the task e.g. CMIS - Create councillor_html
Connection details
Select the Data Share database from the list.
Function
Click on the Astun radio button and select at_sys_create_table entry from the list (from v6.0.0 this is called wkf_create_table under the -Workflow- Function filter).
Parameters
The at_sys_create_table function requires two parameters (the wkf_create_table function in v6.0.0 has one extra parameter being the schemaname in which you wish to create your table).
First select the parameter from the list and then you will be able to enter the value in the Edit parameter area.
tablename
councillors_html
selectstatement
WITH members AS (
    SELECT *, 'https://cmis.mycouncil.gov.uk/cmis/Councillors/tabid/63/ctl/ViewCMIS_Person/mid/383/id/' || id || '/ScreenMode/Ward/Default.aspx' as url
    FROM "councillors")
    SELECT *,
    replace('<div class="cmis-councillor">'
    || '<h5 class="name"><a href="' || url || '" alt="' || forename1 || ' ' || surname || '">' || 'Cllr ' || forename1 || ' ' || surname || '</a></h5>'
    || '<ul>'
    || '<li>' || partyname || '</li>'
    || '<li class="cmis-councillor-portrait">'
    || '  <a href="' || url || '" alt="View Councillor ' || forename1 || ' ' || surname || ' web page"><img src="data:image/png;base64,' || image || '"/></a>'
    || '</li>'
    || '<li>' || basiclandandpropertyunit || '</li>'
    || '<li>' || uniquepropertyreferencenumber || '</li>'
    || '<li>' || uniquestreetreferencenumber || '</li>'
    || '<li>' || primaryaddressableobjectname || '</li>'
    || '<li>' || postcode || '</li>'
    || CASE WHEN telephonenumber = '' THEN '' ELSE '<li> Tel: ' || telephonenumber || '</li>' END
    || '<li class="cmis-councillor-email"><a href="mailto:' || email || '" alt="Send Councillor ' || forename1 || ' ' || surname || ' an email">' || email || '</a></li>'
    || '</ul>'
    || '</div>', '<li></li>', '')
    AS html
    FROM members
You will need to change the "https://cmis.mycouncil.gov.uk..." at the beginning of the selectstatement to to suit your CMIS environment.
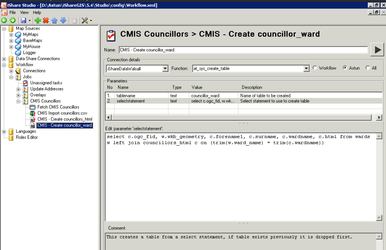
Step 5 - Create councillor_ward lookup
In order to determine which councillors to display for a given property in My House a table must be created with a row per councillor with their corrisponding html content for display and the geometry for the appropriate ward from a wards table.
- Right click on the Build Councillors (CMIS) Job you have just created and select New Task.
- Select the Stored Procedure type and click OK.
Name
Enter a Name for the task e.g. CMIS - Create councillor_ward
Connection details
Select the Data Share database from the list.
Function
Click on the Astun radio button and select at_sys_create_table entry from the list (from v6.0.0 this is called wkf_create_table under the -Workflow- Function filter).
Parameters
The at_sys_create_table function requires two parameters (the wkf_create_table function in v6.0.0 has one extra parameter being the schemaname in which you wish to create your table).
First select the parameter from the list and then you will be able to enter the value in the Edit parameter area.
tablename
councillors_ward
selectstatement
select c.ogc_fid, w.wkb_geometry, c.forename1, c.surname, c.wardname, c.html from wards w left join councillors_html c on (lower(trim(w.ward_name)) = lower(trim(c.wardname)))