Configure a Spatial Data Transformation Task
- Kim Stimpson
- Mike Saunt
- Jo Cook (Deactivated)
- Andrew Bailey
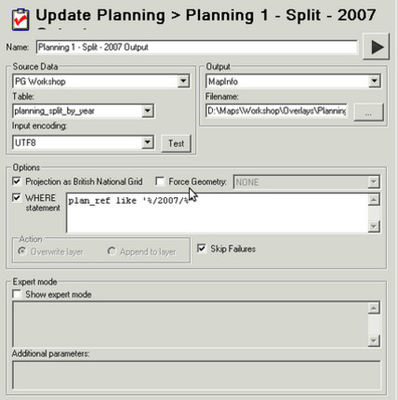
Name
Enter a unique name for your task. It is advisable to call this something relevant as this name will be used to populate list box selections when creating Jobs.
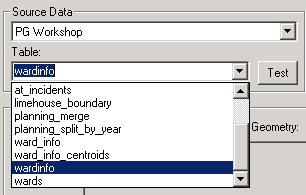
Source Data
This list will include all database Connections together with the options of MapInfo, ShapeFile, KML and Comma-Delimited Text File. Select the Source Data required from the list. Once you have made your selection you will then be able to select either the Source Table or File Name depending upon the type of connection you selected. E.g.
If your destination table is used by a View then you will need to use the Show Expert Mode and add the following as Additional Parameters –config OGR_TRUNCATE YES
If your Source Data is a WFS Workflow Connection you may need to add your proxy details to the Environment Variables of the Server running iShare.
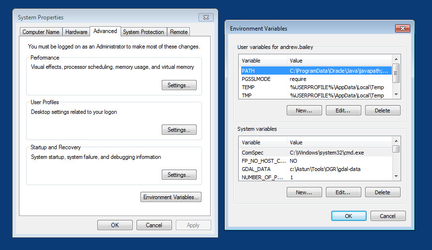
You will need to add the following Variables:
GDAL_HTTP_AUTH
GDAL_HTTP_USERPWD
GDAL_HTTP_PROXY
GDAL_HTTP_PROXYUSERPWD
GDAL_PROXY_AUTH
Please see https://trac.osgeo.org/gdal/wiki/ConfigOptions#GDALOGRHTTPoptions for details on how to configure these settings.
The Input encoding will default to UTF8 but you may select Latin1 from the drop down selection if required.
Output
This list will include all of your Read/Write database Connections [e.g. Postgres] together with the options of MapInfo and ShapeFile. Select the Output required from the list. Once you have made your selection you will then be able to select either the Output Table or File Name depending upon the type of connection you selected.
Table names in PostgreSQL should NOT contain the string 'error' or 'failure' as this causes a Workflow failure.
Also if you are copying a table from PostgreSQL to PostgreSQL and you want the Output table name to be the same as the Input Table name then you need to leave the Output Table entry BLANK e.g.

Options

Projection as British National Grid
This entry should be left checked to use the British National Grid co-ordinates system.
Force Geometry
If you check this entry you will be able to select the type of geometry from the list:
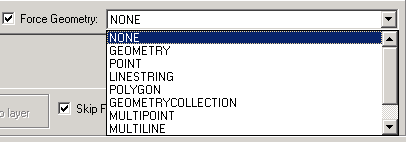
In this way if your Source file had more than one type of geometry you could select the type that you wish to Output. If you do not select the type of geometry and the Source file contains more than one type then the type of geometry of the first record written will be assumed and any other type, which cannot be converted, will be ignored. In this case you would also need to check the Skip Failures entry.
WHERE statement
If you wish to only select certain records to be copied from your Source to your Output then you will need to enter the relevant WHERE statement here.
select decdate,aplddate from mdc_planning where (to_date(decdate, 'YYYYMMDD') <= (date(current_date - interval '5 years'))) OR (to_date(aplddate, 'YYYYMMDD') <= (date(current_date - interval '5 years'))) ;
The above will return all planning applications in the last 5 years.
Overwrite layer
This option will only be available if your Output is a PostGres database. This would normally be used to clear the output before writing out the data.
Append to layer
This option will only be available if your Output is a PostGres database. You would check this entry if you were writing from more than one Source to the same Output and this was NOT the first task to be run.
Skip Failures
Check this entry if you wish to job to skip past any failures such as mismatching geometry as previously described.
Legacy Geometry Column Name
If this is checked then the geometry column in the destination table will always be called wkb_geometry. If it's unchecked then it will be called wkb_geometry if no geometry column is found in the source, otherwise the name of the geometry column in the source is used.
Preserve Case
If this is checked then when the table is created in the Output database the case of the original table name will be preserved. If this is not checked then the generated table name will be all lowercase.
Expert mode

Show Expert mode
The Expert mode will show you the ogr statement that will be run. It will also allow you to append valid ogr Additional Parameters to the end of the statement.
ogr2ogr documentation
Please refer to the ogr2ogr documentation on the GDAL site for details.
If you make changes to your selections you will see this entry changing on the fly. As well as enabling the entry of Additional Parameters this ogr statement can be useful if you need to solve errors. If your task is not running correctly you can copy this ogr statement and run it in a Command prompt.
You may need to specify the path to the ogr2ogr.exe in the Command prompt. You can find the location by looking at the OGR Path specified under the External heading on the Master Settings tab in the iShare Settings.