The following steps outline how this is done.
...
The first task is to configure Workflow to point to the WFS feed. With the Workflow node selected in Studio right click and select Add DataSource from the context menu. You will see the following dialog:
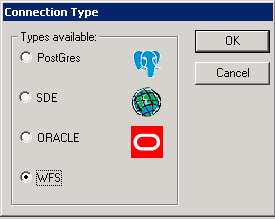

Select the WFS Connection Type and click OK.
| Note |
|---|
If WFS does not appear as an option then you will need to edit the ConTypes.xml file. See the topic Add the WFS Connection Type for details. |
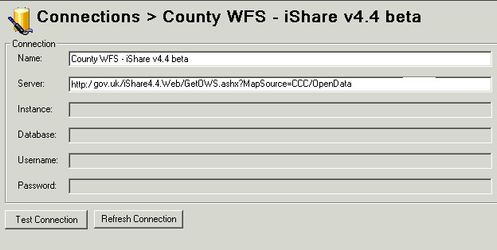
Name
Enter a name for your WFS Workflow connection e.g. County WFS.
Server
Here you need to paste in the URL to the WFS feed.
...
To do this you will need to add a Job entry. Right click on the Jobs node in the tree and select New Job.
Job Name
Enter a unique name for your job e.g. Refresh Childrens Centres.
...
We need to create a Workflow Task to import the WFS data into the PostgreSQL database. Right click on the Tasks node in the tree and select New Task. We need to specify Spatial Data Transformation as the task type and click OK.
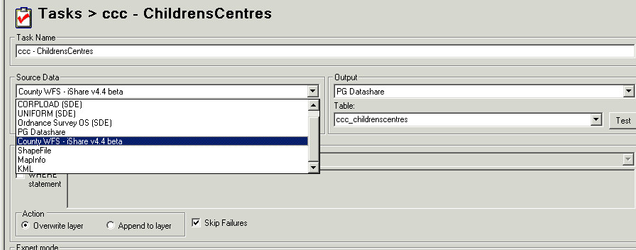
Task Name
Enter a Name for the task. In the above example we have chosen ccc- ChildrensCentres
Source Data
Here you need to select the WFS Workflow Connection you have just created.
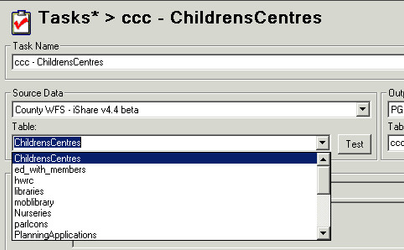
Table
Now we need to select the table that we wish to import into the PostgreSQL database from the list e.g. ChildrensCentres
Output
In this instance will want to output to the PostgreSQL database so select PG Datashare.
Table
Now you need to enter a name for the Table that you wish to create in the PostgreSQL database.
...