Step 5 - Create Job to Import & Build NLPG data
In order that the NLPG data is kept up-to-date you need to create a Workflow Job to run the Tasks required to import and build the NLPG data.
To do this you will need to add a Job entry. Right click on the Jobs entry in the tree and select New Job.
Job Name
Enter a unique name for your job. We have chosen Build from NLPG.
Now you need to create the Tasks & Data Share Connections that you wish to be run for this job.
- Create a Task to Import the NLPG data
- Create Data Share Connections to the NLPG views
- Create a Task to Build the Address Lookups
Add Data Share Connections to views to the job
Although you have created the Data Share Connections to the NLPG views we now need to add these to the Job. Right click on the Build from NLPG job and select Add existing task. A list of Available Tasks will be displayed and all of the Data Share Connections will be in red. You may select entries to add at one time by holding down the Ctrl key whilst making your selection.
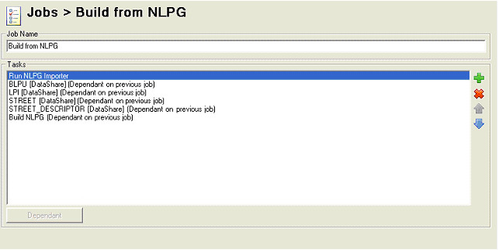
Now all you need to do is to make sure that the tasks are run in the correct order; you can use the up  and down
  arrows to change the order:
- Run NLPG Importer
- Download the NLPG data to Data Share from each of the four views (BLPU, LPI, STREET, STREET_DESCRIPTOR) e.g. synchronise
- Build the Astun Location Lookups
For each task added to the job except the initial one, which in the above scenario is Run NLPG Importer, you will need to select the Dependant button. This means that each task is dependant upon the previous one completing successfully.
Next you need to schedule when to run the update. Simply select the Job in the tree and add a schedule.
For more information on how to schedule a job please refer to the Job Scheduler topic.