If you want to manually edit the SLD for the selected Layer then click on the Advanced tab.
| Note |
|---|
If you manually edit the SLD via the Advanced tab and you add entries that cannot be handled by the SLD Style Editor then the Advanced tab will be your only option. |
| Table of Contents |
|---|
Overview
This is the actual code editing pane and shows the code for the SLD. If you wish to find a specific word in the SLD you may use Ctrl F to display a Find & Replace dialog.
Here you can manually configure the style of your OGC Layer. Astun supply some default SLD files in the folder specified in the iShare Settings General tab SldSnippetDefinitionPath. For more information on SLD please refer to the GeoServer documentation which has plenty of examples http://docs.geoserver.org/stable/en/user/styling/sld-cookbook/index.html.
Toolbar
There is a Toolbar at the top of the Editing pane for common functions:
...
| Note |
|---|
Prior to V5.6.0 you could only have one Rule per OGC Layer. |
Using Multiple Rules
| Status | ||||
|---|---|---|---|---|
|
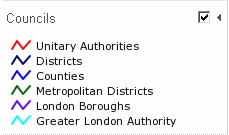
If you wish to apply different styles to a Layer then you can do this using Multiple Rules. The following SLD is an example of how we have styled the Councils layer to display different colours for different types of authority and it appears in iShare GIS like this:
| Code Block | ||||
|---|---|---|---|---|
| ||||
<Rule>
  <Name>Unitary Authorities</Name>
  <Filter>
    <PropertyIsEqualTo>
      <PropertyName>descriptio</PropertyName>
      <Literal>Unitary Authority</Literal>
    </PropertyIsEqualTo>
  </Filter>
  <PolygonSymbolizer>
    <Stroke>
      <CssParameter name="stroke">#FF0000</CssParameter>
      <CssParameter name="stroke-width">2</CssParameter>
      <CssParameter name="stroke-opacity">1</CssParameter>
    </Stroke>
  </PolygonSymbolizer>
</Rule>
<Rule>
  <Name>Districts</Name>
  <Filter>
    <PropertyIsEqualTo>
      <PropertyName>descriptio</PropertyName>
      <Literal>District</Literal>
    </PropertyIsEqualTo>
  </Filter>
  <PolygonSymbolizer>
    <Stroke>
      <CssParameter name="stroke">#000066</CssParameter>
      <CssParameter name="stroke-width">2</CssParameter>
      <CssParameter name="stroke-opacity">1</CssParameter>
    </Stroke>
  </PolygonSymbolizer>
</Rule>
<Rule>
  <Name>Counties</Name>
  <Filter>
    <PropertyIsEqualTo>
      <PropertyName>descriptio</PropertyName>
      <Literal>County</Literal>
    </PropertyIsEqualTo>
  </Filter>
  <PolygonSymbolizer>
    <Stroke>
      <CssParameter name="stroke">#0000FF</CssParameter>
      <CssParameter name="stroke-width">2</CssParameter>
      <CssParameter name="stroke-opacity">1</CssParameter>
    </Stroke>
  </PolygonSymbolizer>
</Rule>
<Rule>
  <Name>Metropolitan Districts</Name>
  <Filter>
    <PropertyIsEqualTo>
      <PropertyName>descriptio</PropertyName>
      <Literal>Metropolitan District</Literal>
    </PropertyIsEqualTo>
  </Filter>
  <PolygonSymbolizer>
    <Stroke>
      <CssParameter name="stroke">#006600</CssParameter>
      <CssParameter name="stroke-width">2</CssParameter>
      <CssParameter name="stroke-opacity">1</CssParameter>
    </Stroke>
  </PolygonSymbolizer>
</Rule>
<Rule>
  <Name>London Boroughs</Name>
  <Filter>
    <PropertyIsEqualTo>
      <PropertyName>descriptio</PropertyName>
      <Literal>London Borough</Literal>
    </PropertyIsEqualTo>
  </Filter>
  <PolygonSymbolizer>
    <Stroke>
      <CssParameter name="stroke">#6600FF</CssParameter>
      <CssParameter name="stroke-width">2</CssParameter>
      <CssParameter name="stroke-opacity">1</CssParameter>
    </Stroke>
  </PolygonSymbolizer>
</Rule>
<Rule>
  <Name>Greater London Authority</Name>
  <Filter>
    <PropertyIsEqualTo>
      <PropertyName>descriptio</PropertyName>
      <Literal>Greater London Authority</Literal>
    </PropertyIsEqualTo>
  </Filter>
  <PolygonSymbolizer>
    <Stroke>
      <CssParameter name="stroke">#00FFFF</CssParameter>
      <CssParameter name="stroke-width">2</CssParameter>
      <CssParameter name="stroke-opacity">1</CssParameter>
    </Stroke>
  </PolygonSymbolizer>
</Rule> |
Using an SLD exported from QGIS
| Step | Example |
|---|---|
| If you open the DB Manager in QGIS, find the Layer you wish to style and select Add to canvas. | |
| Now select the Layer in the Layers Panel in QGIS, right click and select Properties. | |
You will see a Style button with a drop down selection. Select Save Style > SLD File... and save it to a location of your choice. | |
Now we need to extract the information from this SLD and paste it into the SLD Style Editor. Open the SLD in a text editor e.g. Notepad++ Now you need to remove all references to the namespace in our example below this is se: | |
| Use the Replace function to replace the namespace: (in our example se:) with blank. | |
Now you need to extract just the <Rule> information. Our example above just has one Rule but yours may have several so, if you are using v5.6.0 or above, then you can extract them all. Now you can paste this information into the Advanced tab of the SLD Style Editor. |


