PostgreSQL Tuning
References
pgTune
There is an extremely useful utility pgTune to automatically tune your PostgreSQL database.
Update
pgTune settings have been precalculated for different AWS instance types. In addition, to allow more flexible tuning, these settings are now available as SQL queries, as well as postgresql.conf changes. All the details are in PostgreSQL Tuning.
Currently supports PostgreSQL up to version 9.1.
- Download the zip file from https://github.com/gregs1104/pgtune/archive/master.zip
- Extract the files and follow instructions here https://github.com/gregs1104/pgtune
Open a CMD Prompt and enter the following:
c:\python27\python.exe pgtune -i %PGDATA%\postgresql.conf -o %PGDATA%/postgresql.conf.pgtune -T Web
After running the command you will need to perform the following steps:
- Check the postgresql.conf.pgtune output in particular the max_connections value. This should be at least 100.
- Stop the postgresql service using Services,
- Rename postgresql.conf to postgresql.conf.original
- Rename postgresql.conf.pgtune to postgresql.conf
- Restart the postgresql service
It is possible for later version of postgreSQL to use the online version http://pgtune.leopard.in.ua/
Tables
- Make sure that each table has a primary key and a GiST index on the geometry column. If you’ve imported using shp2pgsql or ogr through Studio then they will be created automatically.
- If your data undergoes a lot of editing then run the cluster command. This will physically sort the data by the index.
- Check the record count for a table to make sure it looks correct i.e. you can run ogrinfo on a data source to retrieve the record count and compare with the record count in your table.
Consider reducing the simplified geometries. Calculate the distance a single pixel represents at the lowest scale of your end client (presumably just iShare Maps/iShare GIS). Any geometry detail lower than that distance will never be shown and is a drain on the database. You can use ST_Simplify() to create new versions of the data. Keep the originals elsewhere.
This should only be considered in select cases where rendering speed is the highest priority as simplifying a geometry could result in some spatial queries returning unexpected results
For large tables such as the AstunLocationLookup gazetteer table you can set the table to autovacuum. The following example is the SQL needed to do this. This could be part of a Build Gazetteer job under workflow.
ALTER TABLE "AstunLocationLookup" SET(
	autovacuum_enabled=true,
	autovacuum_vacuum_threshold=1,
	autovacuum_analyze_threshold=1
);
For more comprehensive Tuning
To identify bottlenecks you need to look at your pg log files for warnings and error messages e.g. E:\PG_DATA\pg_log\ . Then you can start looking at the following parameters most of which are covered by pgTune.
Open PgAdmin III and from the File menu select Open postgresql.conf.... Locate the postgresql.conf file which will normally be under the pg_data folder.
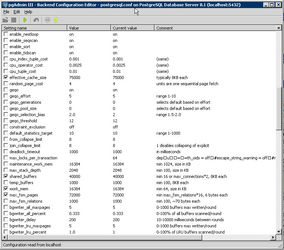
Example for a 3GB Server
Advice has been taken from the page here with key items of:
shared_buffers - pgTune
Editing this option is the simplest way to improve the performance of your database server. The default is pretty low for most modern hardware. General wisdom says that this should be set to roughly 25% - 40% of available RAM on the system. Like most of the options you will simply need to try them at different levels (both up and down) and see how well it works on your particular system. Most people find that setting it larger than a third starts to degrade performance.
Changing this option requires a database service restart, see Applying your changes below for details.
effective_cache_size - pgTune
This value tells PostgreSQLs optimizer how much memory PostgreSQL has available for caching data and helps in determining whether or not it uses an index or not. The larger the value increases the likelihood of using an index. This should be set to the amount of memory allocated to shared_buffers plus the amount of OS cache available. Often this is more than 50% of the total system memory e.g. 75% of available RAM.
work_mem - pgTune
This option is used to control the amount of memory used in sort operations and hash tables. While you may need to increase the amount of memory if you do a lot of sorting in your application, and with iShare the Find Address function does, care needs to be taken. This isn't a system wide parameter, but a ‘per operation’ one. So if a complex query has several sort operations in it, it will use multiple work_mem units of memory. Not to mention that multiple backends could be doing this at once. This query can often lead your database server to swap memory if the value is too large. This option was previously called sort_mem in older versions of PostgreSQL.
Increasing this will allow ORDER BY, DISTINCT clauses, joins to be handled without incurring disk writes. Change to available memory / max_connections.
max_fsm_pages
This option helps to control the free space map. When something is deleted from a table it isn't removed from the disk immediately, it is simply marked as “free” in the free space map. The space can then be reused for any new INSERTs that you do on the table. If your setup has a high rate of DELETEs and INSERTs it may be necessary increase this value to avoid table bloat. In iShare the relevant area would be the frequency of updating the information in Data Share e.g. Planning, Address data etc.
maintenance_work_mem - pgTune
Change this from 16MB to available memory / 8.
wal_buffers - pgTune
Change this from 64KB to 8MB.
Changing this option requires a database service restart, see Applying your changes below for details.
checkpoint_segments
Change this from 3 to 16 up to 128. You must have (chechpoint_segments * 2 + 1) * 8MB worth of available disk space.
random_page_cost - pgTune
Change this from 4.0 to 2.0.
cpu_tuple_cost
Set this at 0.0030.
cpu_index_tuple_cost
Set this at 0.0010.
cpu_operator_cost
Set this at 0.0005.
Maintenance
If you haven’t started your data migration then first adjust your configuration for the duration of the migration. See AnchorSystems page for more details. If you haven’t migrated yet now's the time to realise that keeping your data in defined schemas rather than the public schema is a good idea.
- After any big import of data run VACUUM ANALYZE. Once up and running and the data is by and large static run VACUUM FREEZE.
- Delete columns that are not used.
- Track resource hungry queries. Set log_min_duration_statement = 1000 and log_checkpoints = on. Test site and read logs.
Applying your changes
In most cases a pg_reload_conf will do - see Running a SQL command below for details.
If you have changed share_buffers or wal_buffers a database service restart is required. You can do this out of hours by running a Windows Scheduled task to execute pg_ctl restart - see Scheduling a Database Service Restart below for details.
Running a SQL command
In pgAdmin you will see an SQL button - see button outlined in red below e.g.

First select your database from the tree and then click on the SQL button. This will open the SQL Editor e.g.
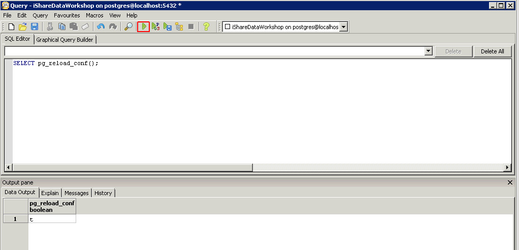
Now you can type in your SQL command e.g. SELECT pg_reload_conf(); and then click the Execute query button highlighted in red in the above screen shot. When the task has run you should see a "t" in the Output pane at the bottom of the dialog to show that the task has completed successfully.
Scheduling a Database Service Restart
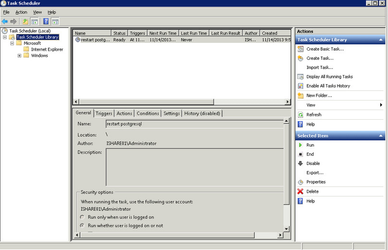
- Log on to the Server as an Administrator
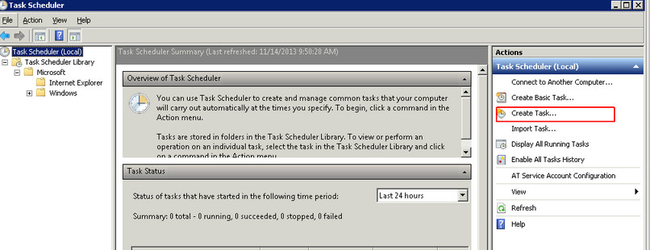
- Run the Windows Task Scheduler (Start > Programs > Administrative Tools > Task Scheduler)
- Select to Create Task from the Actions panel - see entry highlighted in red below.
- On the General tab enter a Name e.g. postgresql restart
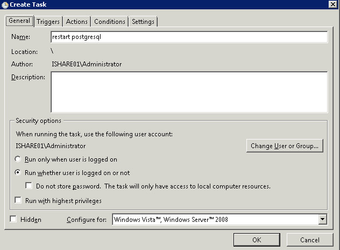
- Click the radio button to Run whether user is logged on or not.
- Select the Actions tab and click on the New button

- Select the Action - Start a program
- Click the Browse button and browse to where you have installed Postgresql and select the pg_ctl.exe e.g.
c:\program files (x86)\Postgresql\9.0\bin\pg_ctl.exe
- In the Add arguments (optional) entry enter the following:
restart -D c:\program files (x86)\postgresql\9.0\data
where "c:\program files (x86)\postgresql\9.0\data" is the path to where ever your data directory is for postgresql
- Click OK to add the Action.
- Select the Triggers tab and click New
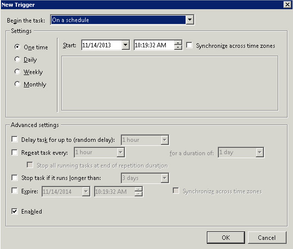
- Select the One Time radio button and select a date and time to run. Click OK to add the Trigger.
- Click OK again to add the Task
- Click OK again and enter administrator password when prompted.
- Select Refresh from the Action menu and you should now see your Task in the Task Scheduler Library e.g.