SQL-05 13: Automating SQL Tasks
5. Automating SQL Tasks
There will be times when you need a task in SQL to be automated, so that it can be triggered from another application, or scheduled to run at a specific time. This module describes a few options for doing this.
5.1. psql
Full database functionality is available through the psql command line shell application. This can be accessed from within pgAdmin, or on the command line - it is installed auomatically with Postgres, normally in the bin folder (e.g. C:\Program Files\PostgreSQL\13\bin\pgsql.exe), and so can be called from a batch file.
Full documentation on psql commands can be found here.
5.1.1. psql in pgAdmin
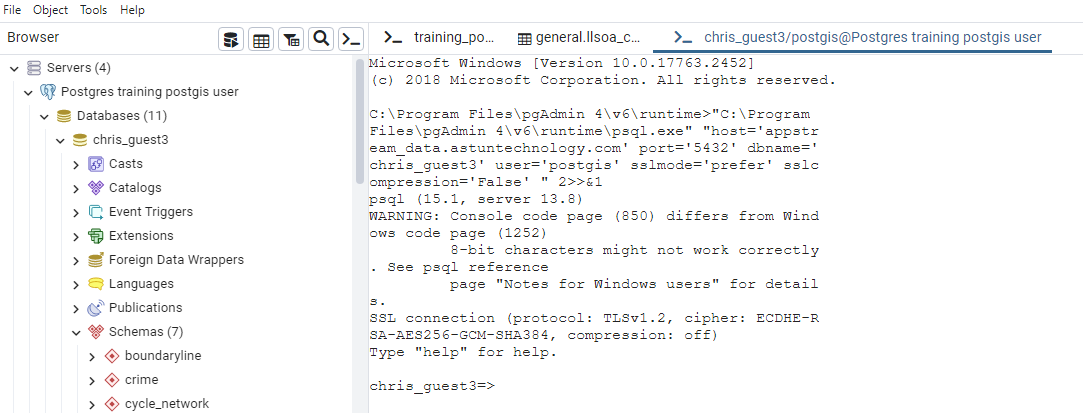
Got to Tools > PSQL Tool to start psql - you will see a screen like this, already connected to your database
Now type in an SQL command into the prompt, remembering to close the statement with a semicolon, for example:
select * from geometry_columns;The full table will appear in the console
5.1.2. Run pqsl from the Command Prompt
You can run pgsql directly from a command prompt (in AppStream, use the OSGeo4W Shell command from the menu).
Start psql by typing the following, which includes the parameters for the database connection (use your own database name)
psql -h appstream_data.astuntechnology.com -d chris_guest3 -p 5432 -U postgisEnter your password (postgis) at the prompt - you will see the following:

You can now enter an SQL statement in the same way as you did in pgAdmin, and press Enter to run it - try this with a SELECT statement on one of your tables, and don’t forget to add a semi-colon ';' at the end
If you are working from the command line, and always using the same database, set the environment variables for the connection to avoid having use the parameters each time - for example:
|
5.1.3. psql Meta-commands
As well as being able to run SQL, psql includes a set of meta-commands, prefixed with a backslash, that are processed by psql itself. Meta-commands make psql useful for administration or scripting - see the PostgreSQL documentation full details.
5.2. Functions
PostgreSQL functions, also known as Stored Procedures, allow you to package queries so that they can be called when needed by any database user, with parameters if appropriate. Postgres/PostGIS are installed with a large number of built in functions - you will find them in the public schema.
Functions can be created in the language of your choice , including SQL, PL/pgSQL, C, and Python - the most common language for creating function is PL/pgSQL.
The basic syntax of a function is below:
|
Create a simple function below by running the code below in the Query Tool
CREATE OR REPLACE FUNCTION general.myfunction(a integer, b integer)RETURNS integer AS$$BEGINreturn a*b;END;$$LANGUAGE plpgsql;Note that a schema name is not required - if it is not supplied, the function will be created in the public schema
Call the function using a SELECT statement in the Query Tool
select general.myfunction(4,3)If you have time, make a change to the function and call it again - note that to update the function, you can select it in pgAdmin then right-click > Scripts > CREATE Script, then amend the function definition run the statement
For more details on functions see https://www.postgresql.org/docs/9.4/static/sql-createfunction.html , and for details on PL/pgSQL see https://www.postgresql.org/docs/9.4/static/plpgsql.html .
5.3. Triggers
A trigger is a set of actions that run automatically when a specified change operation (SQL INSERT, UPDATE, DELETE or TRUNCATE statement) is performed on a specified table. Triggers are useful for tasks such as enforcing business rules, validating input data, and keeping an audit trail.
Create a test table by running the SQL below
CREATE TABLE test_table( col1 text, col2 text, col3 date);Create a trigger function which sets col3 to today’s date when the trigger is executed - this is the action the trigger will generated
CREATE OR REPLACE FUNCTION test_table_trig() RETURNS TRIGGER as$$BEGINnew.col3 = current_date;return new;END;$$LANGUAGE plpgsql;Now create the trigger which will fire at the time of execution
CREATE TRIGGER test_table_triggerBEFORE INSERTON test_tableFOR EACH ROWEXECUTE PROCEDURE test_table_trig();Test the trigger by using INSERT to add a row to the table
INSERT INTO test_table(col1,col2) VALUES('1','2')Look at the table data, and check that today’s date has been added as a value for column 3
For more information on triggers and trigger functions see https://www.postgresql.org/docs/9.4/static/plpgsql-trigger.html .
5.4. QGIS
Because QGIS can be used to run SQL on a Postgres database, and it also has a workflow tool (the Graphical Modeller), it can be used to automate tasks in Postgres.
Open QGIS, and go to Processing > Graphical Modeler
In the Algorithms panel, search for Postgres, and double-click on PostgreSQL Execute SQL to include the process in your model
Double-click on the process in the model window to open it
In the dialog:
Set the Description to Add column
Set the Database (connection name) to the connection you created earlier
In the SQL query field, add
ALTER TABLE test_table ADD COLUMN testedit_date dateClick OK to save these settings
In the Model Designer, click the Run model button or F5 to run the model
In pgAdmin, check that the new field has been added to the data, and right-click > Delete/Drop to remove it so we can run the process again
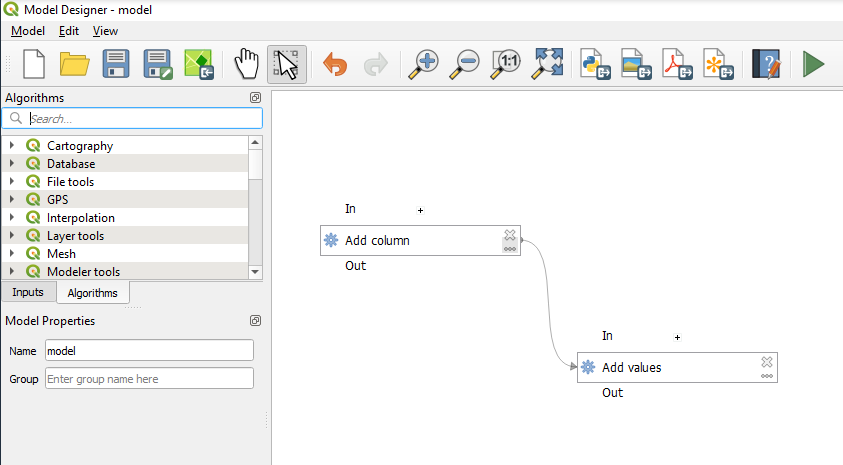
In the Graphical Modeler, add another PostgreSQL Execute SQL process to the model in the same way as before
This time, rename the process Add values, and add some data to the table you have just updated, using the following SQL in the SQL query field
INSERT INTO test_table(col1,col2, test_from_qgis) VALUES('3','4','test_value')Under Dependencies, add a dependency on the previous process - this will make this process run after the previous one
Click OK - your model should look something like this
Run the model, then check the results in pgAdmin
When you are finished, save the model for future use