Step 3 - Import AddressBase into iShare
In order that the AddressBase Premium data is kept up-to-date you need to create a Workflow Job to run the Tasks required to import and build the AddressBase Premium data. You'll need the AddressBase CSV functions available from Astun Support.
Create Workflow Job
To do this you will need to add a Job entry. Right click on the Jobs entry in the tree and select New Job.
Job Name
Enter a unique name for your job e.g. Load AddressBase.
Create Workflow Tasks
Now you need to create the Tasks that are required for building your AddressBase Lookups.
1. Create an Area of Interest - Optional
You would only need to create this Task if you needed to apply an Area of Interest to your AddressBase data i.e. you want to reduce the size.
Select to create a Stored Procedure Task.
Name
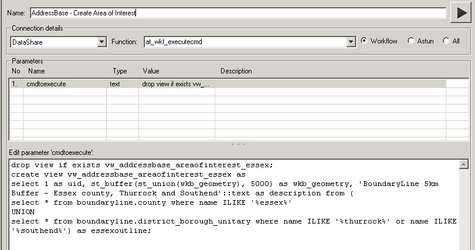
Enter a name for the task e.g. AddressBase - Create Area of Interest.
Connection Details
Select the iShare database from the list. Then select the Workflow radio button as this will limit the list of available Functions and then select the at_wkf_executecmd entry from the list (from v6.0.0 this is called wkf_executecmd under the -Workflow- Function filter).
Enter the following information into the Edit parameter box and change it to match your requirements.
drop view if exists vw_addressbase_areaofinterest_essex;
create view vw_addressbase_areaofinterest_essex as
select 1 as uid, st_buffer(st_union(wkb_geometry), 5000) as wkb_geometry, 'BoundaryLine 5km Buffer - Essex county, Thurrock and Southend'::text as description from (
select * from boundaryline.county where name ILIKE '%essex%'
UNION
select * from boundaryline.district_borough_unitary where name ILIKE '%thurrock%' or name ILIKE '%southend%') as essexoutline;
In the above example, created for Essex, we are creating a view which combines Essex County and Thurrock and Southend District Borough. Combine, Union and then Buffer by 5km.
Click on the Play button to run the task. Depending upon the size of your AddressBase database this may take a little while.
2. Transfer the AOI to the AddressBase database - Optional
This Task only applies if you have created an AOI i.e. Step 1.
Select to create a Spatial Data Transformation Task.
Name
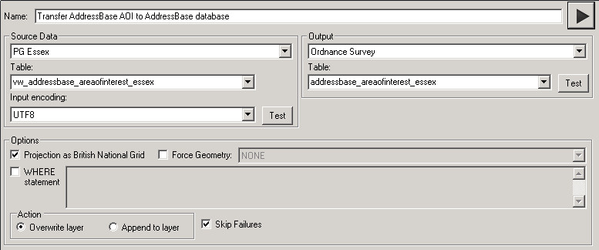
Enter a unique name for your task e.g. Transfer AddressBase AOI to AddressBase database.
Source Data
Select the iShare database from the list and select the View you have just created from the Table drop down list.
Output
Select the AddressBase database from the list and enter the name of the Table that you wish to create.
Click on the Play button to run the task. Depending upon the size of your AddressBase database this may take a little while.
3. Import the AddressBase data into the iShareData database
Select to create another Spatial Data Transformation Task.
Name
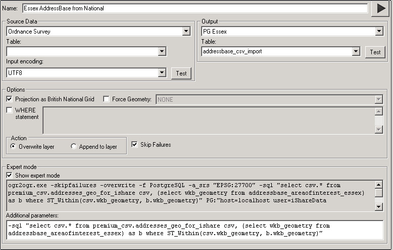
Enter a unique name for your task e.g. AddressBase from National.
Source Data
Select the AddressBase database from the list and leave the Table entry blank as this is going to be selected in the SQL statement.
Output
Select the iShare database from the list and enter the name of the Table that you wish to create addressbase_csv_import.
Show Expert mode
Tick this box and enter the following in the Additional parameters. The key element here is the following SQL statement
-sql "select * from premium_csv.addresses_geo_for_ishare"
OR
-sql "select csv.* from premium_csv.addresses_geo_for_ishare csv, (select wkb_geometry from addressbase_areaofinterest_essex) as b where ST_Within(csv.wkb_geometry, b.wkb_geometry)"
Replace addressbase_areaofinterest_essex with whatever you called your AOI in Step 1.
Click on the Play button to run the task. Depending upon the size of your AddressBase database this may take a little while.
4. Build the iShare Address Lookups
Now we need to build the Address Lookup tables. Create a Stored Procedure Task.
Name
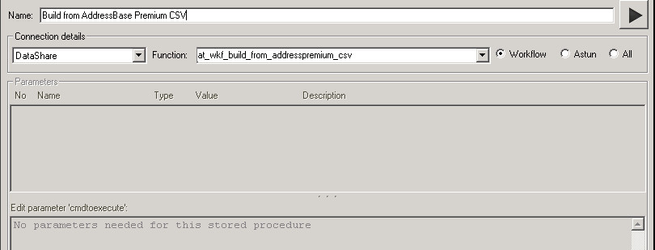
Enter a name for the task e.g. Build from AddressBaseBase Premium CSV.
Connection Details
Select the iShare database from the list. Then select the Workflow radio button as this will limit the list of available Functions and then select the at_wkf_build_from_addresspremium_csv entry from the list, (from v6.0.0 this is called wkf_build_from_addresspremium_csv under the -Workflow- Function filter).
If these haven't been loaded then the are available here
Click on the Play button to run the task. Depending upon the size of your AddressBase database this may take a little while.
5. Create Spatial indexes
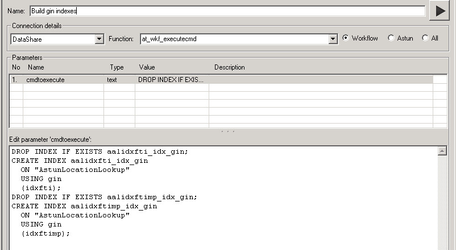
As the AddressBase dataset is a large dataset we need to create Spatial indexes on the data in order to speed up text searches on the data. Select to create a Stored Procedure Task.
Name
Enter a name for the task e.g. Build Spatial indexes.
Connection Details
Select the iShare database from the list. Then select the Workflow radio button as this will limit the list of available Functions and then select the at_wkf_executecmd entry from the list.
Enter the following information into the Edit parameter box.
DROP INDEX IF EXISTS aalidxfti_idx_gin;
CREATE INDEX aalidxfti_idx_gin
  ON "AstunLocationLookup"
  USING gin
  (idxfti);
DROP INDEX IF EXISTS aalidxftimp_idx_gin;
CREATE INDEX aalidxftimp_idx_gin
  ON "AstunLocationLookup"
  USING gin
  (idxftimp);
Click on the Play button to run the task. Depending upon the size of your AddressBase database this may take a little while.
6. Make the Address Lookups Mappable - Optional
This step is only required if you wish to display your AddressBase properties on a map.
Select to create a Stored Procedure Task.
Name
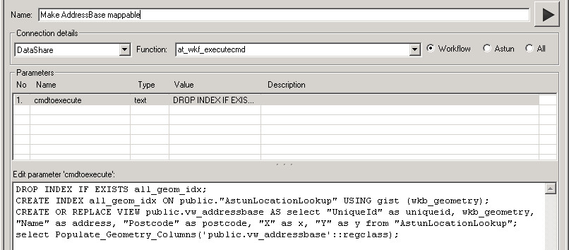
Enter a name for the task e.g. Make AddressBase Mappable
Connection Details
Select the iShare database from the list. Then select the Workflow radio button as this will limit the list of available Functions and then select the at_wkf_executecmd entry from the list.
Enter the following information into the Edit parameter box.
DROP INDEX IF EXISTS all_geom_idx;
CREATE INDEX all_geom_idx ON public."AstunLocationLookup" USING gist (wkb_geometry);
CREATE OR REPLACE VIEW public.vw_addressbase AS select "UniqueId" as uniqueid, wkb_geometry, "Name" as address, "Postcode" as postcode, "X" as x, "Y" as y from "AstunLocationLookup";
select Populate_Geometry_Columns('public.vw_addressbase'::regclass);
Click on the Play button to run the task. Depending upon the size of your AddressBase database this may take a little while.
Check Order of Tasks
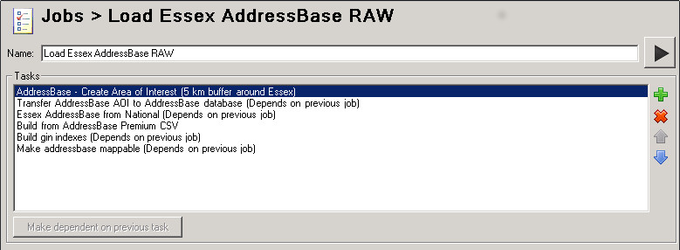
Once the Tasks have been created all that will be left to do is to make sure that the tasks are run in the correct order; you can use the up and down arrows to change the order:
For each task added to the job except the initial one, which in the above scenario is AddressBase - Create Area of Interest, you will need to select the Dependent button. This means that each task is dependent upon the previous one completing successfully.
Schedule Job to run
Next you need to schedule when to run the update. Simply select the Job in the tree and add a schedule.
For more information on how to schedule a job please refer to the Job Scheduler topic.
