Configuring Publisher in Studio
- Kim Stimpson
iShare Publisher allows you to perform on-line searches on any of your back office databases. The data from these databases is first loaded into the iShare database via Data Share and then displayed using the iShare Publisher Templates.
You will need to perform the following steps using iShare Studio.
- Create the Data Share Connection(s) for Publisher
- Configure the Search fields
- Build the Search Index
Create a Data Share Connection for Publisher
You need to configure a Data Share Connection for each Data Source that you wish to be able to search on and also the search fields to use.
- Select the Data Share Connections node and either click on the green plus
 or right click and select Add Datasource.
 - When configuring a connection to be used by Publisher you need to select the Internal Data Source type.
- Click on the Construct SQL button and select the table that you wish to be able to search on.
- Select the fields that you wish to be able to search on and display in Publisher and click OK.
- Enter a unique Name for your new connection and select a field to be the Link field. The contents of this link field will be used as the link when displaying the data in Publisher and is normally the unique id.
- Once you are happy with your entries, click OK.
Configure the Search fields
- Select the Fields node of your new Publisher [Internal] Data Share connection and select the fields that you wish to View / Search on. For more information on how to use this panel please refer to the section on Selecting Fields to Display.
- Now we need to configure the fields for searching. Right click on the Publisher Data Share connection and select Add Search.
- Using the arrows provided select the fields that you wish to be able to search on and display in Publisher.
- Now you need to select each of the fields in turn from the Selected For Indexing panel in order to define the Field Settings.
Field Settings
Index Name
Enter a name that you wish to give this index field. This will be forced to lowercase alphanumeric.
Index Type
This can be one of the following:-
DATE | If you wish this field to be used as a From or To date in your Publisher template |
EXACTMATCH | If you select this index type then you must configure a Regular Expression. This could be used for searches on websites where the user will enter www. Or something like a Planning Reference. |
FILTERMATCH | This type must be used if you wish this field to be selected from a drop down selection in your Publisher template |
FULLTEXT | This type must be selected if you wish this field to be searched using the Lucene search. |
NONE | This type is for fields that you do not wish to be used for searching but you do want to be returned in the list of results. |
Searching will be performed in the following sequence:
- Check for Regular Expression match
- Full text search
Highlight in results
If this is checked, any matches on this field will be highlighted in the results using HTML tags.
Sample Text
Enter some sample text to match the format required for this field.
Regular Expression
If the Index Type is EXACTMATCH, this textbox will be enabled and it will be mandatory to enter a regular expression here. If the term entered matches this regular expression then the relevant field will be searched for an exact match. If an exact match is not found then any FULLTEXT fields will be searched for the entered term. Below is an example of a Regular Expression.
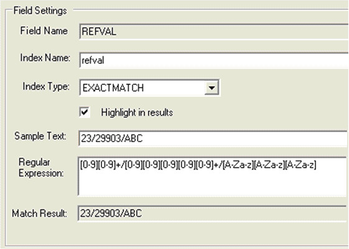
If you have entered the Regular Expression the correctly matches your Sample Text a Match Result will be displayed; if not this will remain blank.
Index Location
This is the directory where the index files will be stored. This would normally be on the same server as the Data Share database.
Build index on Disk
Checking this option allows you to build the index on the disk rather than in memory. This fixes the problem where creating indexes over an extremely large number of records caused the memory usage to increase until an “OutOfMemory” exception is thrown.
Test Search
If you wish to test your search enter data in the Search Expression and click the Search button. Matching results will be displayed in the Results grid.
- Click Save to save your search configuration.
Build the Search Index
Now that you have configured your Search Fields you need to build your Search Index. Right click on the Internal Data Share connection and select Rebuild Search Index. This may take a little while depending upon the size of the database. This will populate the directory you have defined as your Index Location.