Create a Plugin for iShare GIS
- Kim Stimpson
- Peter Goulborn
Overview
iShare GIS has a plugin system which allows you to add buttons and dialogues which you can use for custom functionality. This guide describes that system and takes you through the steps for creating a custom plugin.
Prerequisites
- An understanding of how to write and debug JavaScript
Overview
The plugin system is already used to add the Standard and Advanced toolbars into iShare GIS, but can be customised to add/remove buttons as required. It accomplishes this by reading a specific XML file for a Map Source, or if one isn't specified, the default one. This XML file describes which plugin to add, each of which is a sub-folder of the folder containing the XML file.
Default Plugins
The default plugins XML file (/web/plugins/iShareGIS.xml) contains the following:
<PluginView>
  <Plugin>LayerPanel</Plugin>
  <Plugin>Edit</Plugin>
  <Plugin>Find</Plugin>
  <Plugin>Output</Plugin>
  <Plugin>Layers</Plugin>
  <Plugin>BaseMap</Plugin>
  <Plugin>Profiles</Plugin>
  <Plugin>Select</Plugin>
  <Plugin>View</Plugin>
</PluginView>
The plugin buttons are loaded in the order that the plugins are specified in the XML file.
The plugins folder has the following subfolders:
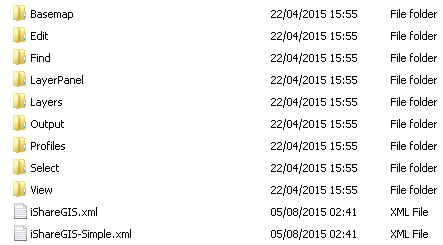
As you can see, each plugin name references a sub-folder, and in each sub-folder, there are three files, all named the same as the sub-folder, but with different extensions e.g.
| Filename | Description |
|---|---|
| Layers.css | This file contains any CSS required for the plugin. |
| Layers.xml | This file contains the metadata about the plugin. |
| Layers.js | This is the code for the plugin itself. |
Custom Plugins
In order to prevent your custom plugins being lost when you upgrade your version of iShare GIS, custom plugins are kept under the \web\custom\plugins folder. This folder must contain at least one XML file defining however many custom plugins are required.
In order for iShare GIS to load your custom plugins, you will need to manually add a PluginViews section, pointing to both the default iShareGIS.xml and your CustomPlugins.xml file, to any Map Source where you wish the plugins to be available as shown here.
<MapSource version="200" guid="012345678-9abc-def0-1234-56789abcdef">
  <LayerGroups>
    ...
  </LayerGroups>
  <PluginViews>
    <PluginView>plugins/iShareGIS</PluginView>
	<PluginView>custom/plugins/CustomPlugins</PluginView>
  </PluginViews>
</MapSource>
The PluginView value (custom/plugins/CustomPlugins) is the path the to XML file (without the .xml extension) which will be read in and added to iShare GIS for this Map Source.
The Plugin XML
<Plugin>
	<Name>drilldown</Name>
	<Description>Enables Enables interactive selecting of features from pre-defined layers via the map</Description>
	<Category>advanced</Category>
</Plugin>
Name
The name of the plugin.
Description
A description for the plugin.
Category
This can be either "standard" or "advanced" and determines whether the button is positioned on the iShare GIS toolbar to the right or left respectively.
The Plugin JavaScript
The commands for adding components are fairly straightforward, and can be broken into three main commands; installButton, installDialog and installPanel.
installButton(config, category, profile);
This adds a button to iShare GIS.
| Object | Property | Description |
|---|---|---|
| config | JavaScript object which contains configuration properties about the button. Commonly used properties are: | |
| name: | The name of the button | |
| type: | What type of dialog to display when the button is clicked (or an empty string for no dialog) [ quickdialog | modaldialog ] | |
| dialog; | The name of the dialog to show when the button is clicked e.g. Astun.JS.Plugins.dialogs.mydialog where mydialog is the name of the dialog. | |
| hideOnEmptyDialog: | Should the button be hidden if the dialog is empty [ true | false ] | |
| text: | The text to go in the button | |
| tooltip: | The tooltip text that is shown when you hover over the button | |
| tooltipTitle: | The title of the tooltip that is shown when you hover over the button | |
| click: | A function which will be called when the button is clicked | |
| category | Optional - Usually, this can be ignored, as the category is set in the plugin XML file. The default uses standard and advanced for the different toolbars. | |
| profile | Optional - For future use, can be safely ignored |
installDialog(name, config, category, profile);
This adds a dialog to iShare GIS which can be referenced by a button - using the dialog property of the installButton object.
| Object | Description |
|---|---|
| name | The name of the dialog so that it can be referenced. A dialog called mydialog would be referenced by Astun.JS.Plugins.dialogs.mydialog |
| config | Usually a function which accepts two parameters which in turn would return a standard JavaScript object which would be used to render the dialog. (See the Examples for more information) |
| category | Optional - Usually, this can be ignored, as the category is set in the plugin XML file. The default uses standard and advanced for the different toolbars. |
| profile | Optional - For future use, can be safely ignored |
installPanel(name, config, category, profile);
This adds a panel to iShare GIS which can be referenced by a button.
| Object | Description |
|---|---|
| name | The name of the panel so that it can be referenced. A panel called mypanel would be referenced by Astun.JS.Plugins.panels.mypanel. |
| config | Usually a function which accepts three parameters which in turn would return a standards JavaScript object which would be used to render the dialog. (See the Examples for more information) |
| category | Optional - Usually, this can be ignored, as the category is set in the plugin XML file. The default uses standard and advanced for the different toolbars. |
| profile | Optional - For future use, can be safely ignored |
Examples
Hello World!
This simple example will display a windows alert with the words "Hello World!" in it.
Astun.JS.Plugins.installButton(
	{
		name: "helloWorldButton",
		type: "",
		dialog: null,
		hideOnEmptyDialog: false,
		text: 'My Button',
		tooltipTitle: 'Hello world!',
		tooltip: 'This shows the Hello World dialogue',
		click: function() {
			// This function is called when the button is clicked
			window.alert('Hello World!');
		}
	}
);
Active Layers
This plugin will display a dialog which lists all of the active layers and shows the layers legend image.
Result
This produces the following output in a dialog:
CurrentView
This plugin will produce an image of the current view of the map.
div.ishare-currentview img {
    max-width: 800px;
}
div.ishare-currentview {
    text-align: center;
}
Result
This produces the following output in a dialog:
ViewQuery
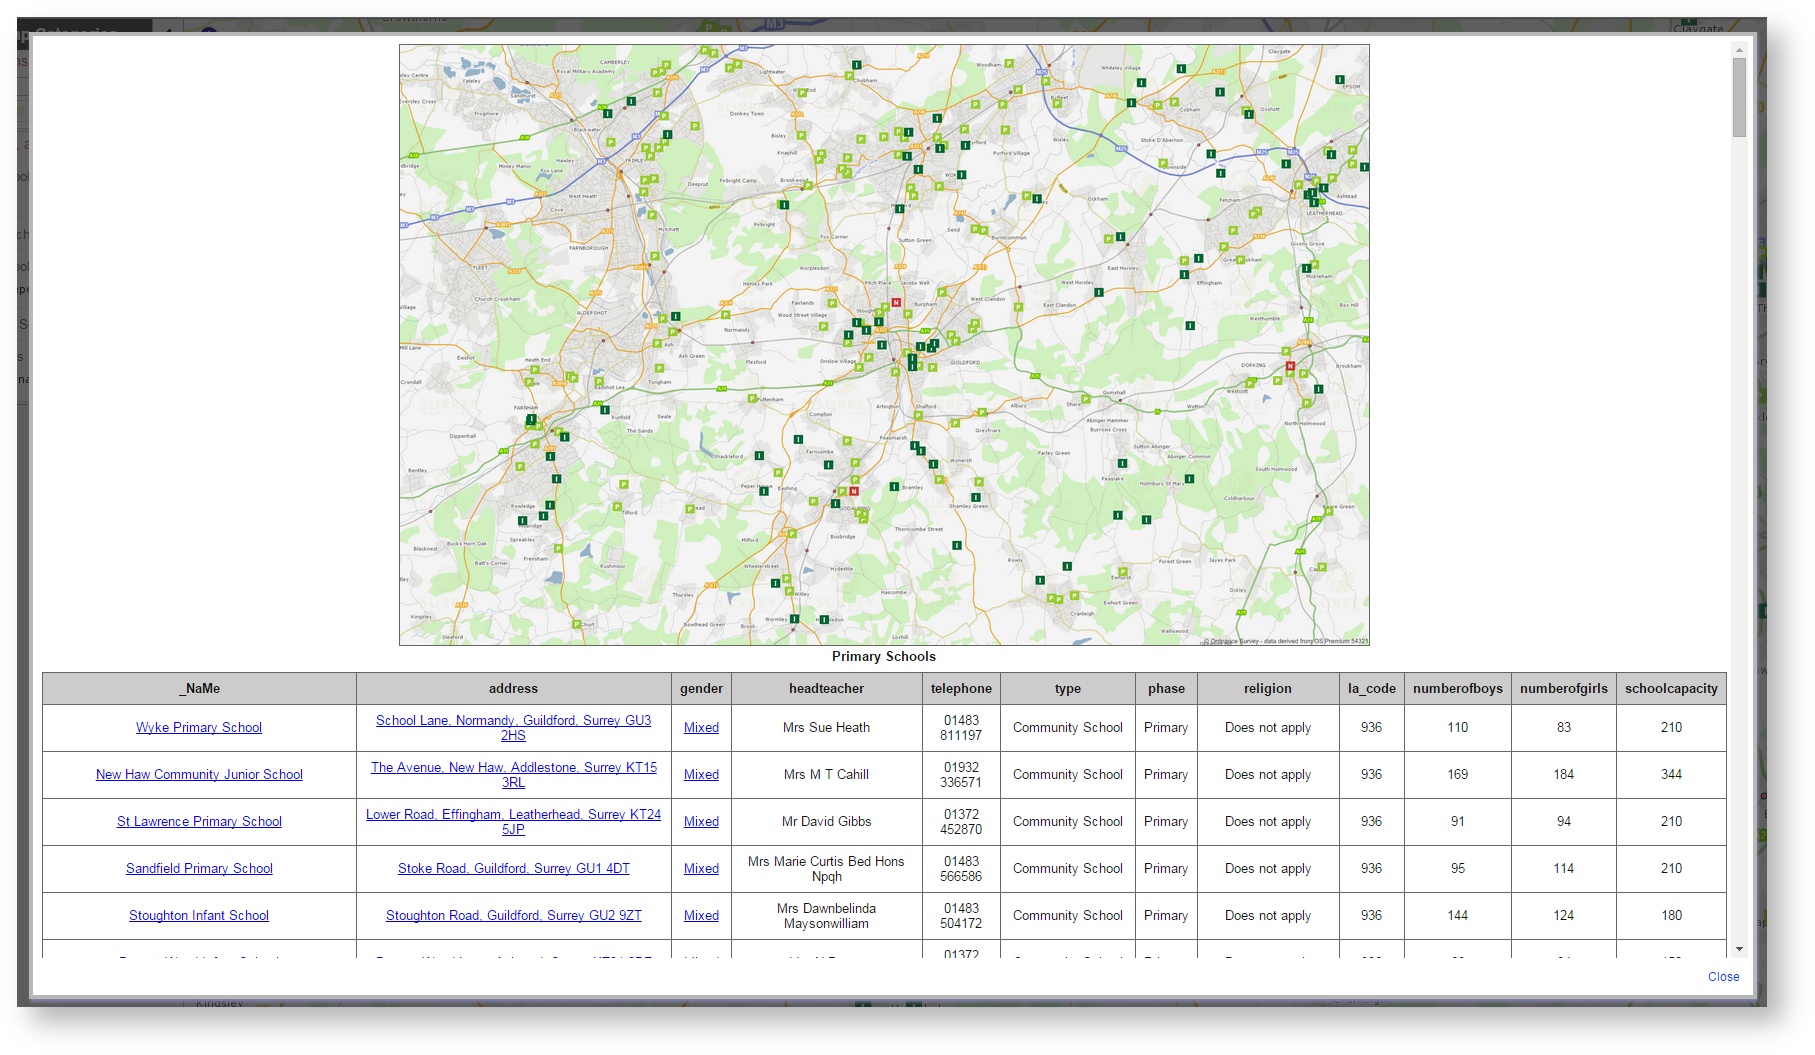
This Plugin we are going to create is called ViewQuery and will be a mixture of the previous examples as well as a new topic. The plugin will take your current view and output the following:
- A small map of your current view
- A list of features shown on the map for each layer
The new topic we haven't covered before is to query iShare GIS and pull back a list of features for the current view. To do this, we use a function called
astun.mapWrapper.getMapMultiInfo(coordinates, pxTolerance, queryType, callback, options);
The parameters are:
| Parameter | Description |
|---|---|
| coordinates | A point or WKT for a shape for which to query |
| pxTolerance | The pixel tolerance to use when querying a point |
| queryType | What type of query to do [ shapeinfo | info ] |
| callback | The function to call when the query returns |
| options | This is a JavaScript object and can contain the options for the query. Our use is to pass in the layer to query |
Result
This produces the following output in a dialog: