Seeding a Tilecache
We recommend that our iShare in the Cloud customers create a Dynamic Tilecache for their Base Mapping, but please discuss this with one of the Astun Team via the Support Portal prior to setting this up.
Basic Options
The preferred way to use TileCache is to 'seed' a cache from the command line, by running tilecache_seed.py.
You must be in the Tilecache folder to run this command.
This will take a while to create the entire cache but means that all files will be always be served statically, which should be the fastest method. Once the cache has been created, all you need to do is to create a virtual directory (no application needed) that points to the cache folder e.g. d:\TileCache\Cache.
This needs to have the layer in tilecache.cfg to build and the levels of zoom set at the command line, e.g.:
tilecache_seed.py -f base_Standard 0 8
where:
tilecache_seed.py | Python script to create the tilecache |
-f | This forces TileCache to overwrite existing tiles |
base_Standard | This matches the layers entry in the tilecache.cfg file and a LAYER or GROUP in the .map file. |
0 8 | This runs TileCache for resolutions 0 to 7 [in red below]. These resolutions are automatically generated when the Base Map Scales are configured in iShare Studio. resolutions=72,38,25,16.6666076469763,8,5.29174706467881,2.1167745319,1.05,0.5,0.25,0.125 |
See TileCache's readme for more details.
Advanced Options
When seeding a TileCache the python script will make a WMS request to MapServer for EVERY tile that is needed. When you have large areas this can take a considerable amount of time especially for the levels (say after level 4 or 5). TileCache has an option for MetaTiling which forces TileCache to request a much larger image (4 or 8 times the size of a single tile) and then Python splits the resulting images into the individual tiles. MetaTiling is recommended to ensure that long labels are correctly rendered.
This is MUCH faster but if run for the top most levels sometimes no image data is returned (as it maybe outside the extent of the map) and then TileCache python script will fail.
Note: If you wish to use MetaTiling then you will need the Python Imaging Library [PIL] installed for the version of Python that you are using to run the tilecache.
Taking the above into account the quickest way of seeding a TileCache is to perform two passes (this will be implemented within the Studio in the future) - one for the top most levels on a tile by tile basis and then to switch to a metaTile option for the lower tiles. The process would therefore be:
- tilecache_seed.py -f base_Standard 0 4 (-f forces TileCache to overwrite existing tiles)
- edit the tilecache.cfg manually and add the following option to the required layer defintion - metaTile=true at the end
[base_Standard]
type=WMS
url=http://localhost/cgi-bin5.2/mapserv?map=D:\\Maps\\Workshop\\_MapServerConfig\\base_Standard.map
extension=png
srs=EPSG:27700
layers=base_Standard
resolutions=72,38,25,16.6666076469763,8,5.29174706467881,3.52811834926054,2.11677453194175,1.05865549688159,0.5,0.25,0.125
bbox=429349, 558276, 442121, 569136
watermarkImage=D:\Astun\Workshop\Web\images\astun\watermark.png
watermarkOpacity=0.5
metaTile=true
- tilecache_seed.py -f base_Standard 4 12 (-f forces TileCache to overwrite existing tiles)
Avoid partial labels
As above, use metaTiling to avoid partial labels but also use the settings below in tilecache.cfg. This information has been provided from Thomas Bonfort via here and reproduced below.
metaTile=true
metaSize=3,3
metaBuffer=10
And in the mapserver files use;
WEB
    METADATA
        labelcache_map_edge_buffer "-10"
    END
END
and use PARTIALS FALSE in all label blocks.
Avoid issues with HTTP proxy
HTTP proxy issues can result in a "Bad Gateway 502" error when Seeding your TIlecache. Try running the following in the command prompt prior to running the TileCache seed command to avoid a proxy server being used for local requests. If the host in the WMS URL is not localhost then add the hostname to the list in the command below.
set NO_PROXY=localhost,127.0.0.*
Setting the NO_PROXY environment variable in the command prompt will only affect the current command prompt session. The IP in the example is the local IPv4 address (commonly 127.0.0.1 is the local machine).
Avoid issues with WMS request
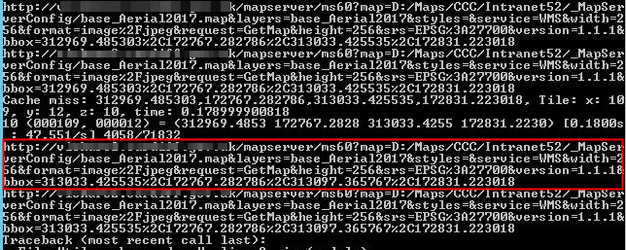
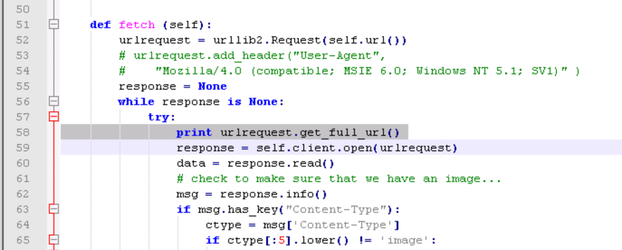
It can sometimes be useful to log the URL used for each request to MapServer. That way you can try visiting the URL in a browser to see if it causes an error. To view the URLs can you add the following line at line 58 of TileCache\Client.py which can be found in Astun\Tools\TileCache folder:
print urlrequest.get_full_url()
E.g:
The highlighted section in the following screenshot shows the URL within the cmd window. You can then copy and paste any URLs that you wish to investigate.