Configuring Raster Layers
- Kim Stimpson
- Jo Cook (Deactivated)
- Andrew Bailey
Raster Layers are usually used as Base Mapping but they may also be used for My Maps. If you are using them for My Maps then simply define a raster layer in the .map file and create a Map Source layer that's associated with it. Bear in mind that the Info click mechanism will not return information. Any information relating to the values of the raster should be displayed through a legend graphic. If you wish to use local raster sources as a Base Map for iShare then follow the instructions below which describe the creation of the .map file, WMS compliance and the build of a WMS base map Map Source.
If you have multiple sets of Raster images to process then you may wish to check the page on using a Batch Script for creating tileindices.
For iShare GIS a Legacy map source can be used instead without the WMS compliance.
Creating the Tile Index
There are two ways of creating the .shp file which is the Tile Index for your Raster layer. The easiest way is using QGIS.
Using QGIS
Open QGIS and select Miscellaneous > Tile index from the Raster menu e.g.
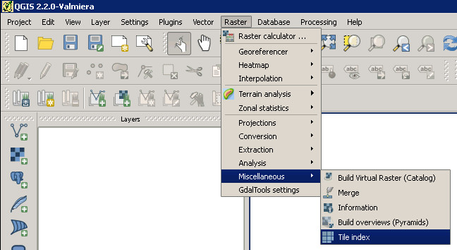
This will display the following dialog:
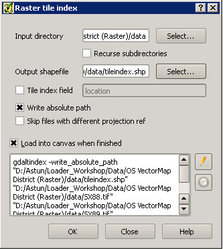
Select the Input directory where your tiles reside and the Output shapefile which is the path to the .shp file that you wish to create. You must select the entry Write absolute path.
Click OK to create the Tile index. You will notice that it is actually running the gdaltindex command.
WIthout QGIS
If you don't have QGIS then the process is a little longer.
- Navigate to the folder where the raster files reside.
- Use the following command to create a file listing all the raster files in the directory. Switch the command to list *.jpg as appropriate.
dir /s/b *.tif > tileindex.txt
- Now, from a command prompt, navigate to the folder where you have created your .txt file and run the following:
D:\astun\tools\ogr\gdaltindex <Tile_index_name>.shp --optfile <path to file>.txt
Update the .MAP file
Now you have created the Tile Index .shp file you then add this as a WMS layer to the BaseMap or MyMaps .map file e.g.
	LAYER
		METADATA
			WMS_TITLE "OS Vectormap District (Raster)"
		END
		NAME OSVectormap
		STATUS DEFAULT
		TILEINDEX "D:/OS VectorMap District (Raster)/data/osvectormapdistrict.shp"
		TYPE RASTER
	END
You will also need to Configure the .MAP file for WMS requests.
Configuring your Raster Layer as a Basemap
If you are using the Raster layer as a BaseMap then you will need to configure a new Mapsource.
- In Studio right click on the BaseMaps node and select Create New Mapsource. You will be presented with a list of existing MapSources from which you may select one to copy. See BaseMaps Configuration for full details.
- Enter the File name for you Mapsource and click Save.
Map Name
Browse to your .map file
Basemap Type
This must be WMS.
For details of all the options see BaseMaps Options. You may also configure the BaseMaps Startup details.
- Click on the Details under the new Mapsource you have just created as this is where you need to enter the URI.
Name
Enter the Group or Layer name e.g. OSVectormap in the above example
URI
http://<ishare web application>/getOWS.ashx?Mapsource=<map_source>&map=<path.to.map.file>
Where <map_source> is the path to the mapsource without the .xml extension e.g. client_config_folder\file_name and <path.to.map.file> is the same as the Map Name.
See BaseMaps Details for further information.
Create a Tilecache
You can now create a Tilecache if required.
When generating a TileCache for Aerial layers where there are regions without Aerial Photo Data, in addition to the Layer for the Aerial Photography itself, an additional layer needs to be set up to cover the blank/empty regions (built in a similar way to creating OutOfArea masks - i.e. subtracting the Aerial data from a polygon covering the whole region). See Tilecache and Aerial Layers for details.