Including a Selection panel in iShare Solo

5.4.10+

Once again we will first show you some example code. There are three main differences:

An example page "atSoloMapWithSelector.html"  is included with iShare in the WebApps\Web\Examples folder.

When creating your own Solo Map please take a copy of the latest example atSoloMapWithSelector.html as this page may not contain the latest changes.

atSoloMapWithSelector.html
<!DOCTYPE html>
<html>
	<head>
		<title>iShare - Solo</title>
        <!-- This script is only needed for the examples as they site in a subdirectory structure -->
        <script type="text/javascript" src="../js/basehrefresolver.js"></script>
        
		<script type="text/javascript" src="js/lib/prototype-1.6.0.3.js"></script>
		<script type="text/javascript" src="FileIncluderJS.aspx"></script>
		<script type="text/javascript" src="js/solomap.js"></script>
		<script type="text/javascript">
			soloMap.addFindNearestPanel();
			soloMap.addSearchForPanel();
			soloMap.addSearchPanel({ 'title': 'My Search Panel' });
			soloMap.addTakeMeToPanel();
			soloMap.addSelectionPanel({ collapseInStart: false });
			soloMap.addShowmapCategoriesPanel({ collapseInStart: false });
			
			soloMap.createMap('atMap', { themeName: 'base', mapSource: 'Workshop/AllMaps', view: { easting: 513052, northing: 152987, zoom: 50000 } }, null, function () {
				$eventElement.bind('astun:selectionComplete', function(event, results) {
					output = '';
					results = results.results;
					
					for (var i = 0; i < results.length; i++) {
						for (var j = 0; j < results[i].features.length; j++) {
							output += results[i].features[j].properties.html + '<hr />';
						}
					}
					
					jQuery('#lookup-results').html(output);
				});			
			});
		</script>
		<style type="text/css">
			#atMap {
				position: relative;
				height: 500px !important;
				width: 100%;
				padding: 0;
				border: 1px solid #ccc;
			}
		</style>
		<link rel="stylesheet" type="text/css" href="custom.example/css/iShareCommon.css"  />
		<link rel="stylesheet" type="text/css" href="custom.example/css/Map.css"  />
		<link rel="stylesheet" type="text/css" href="custom.example/css/atPrint.css" media="print" />
		<link rel="stylesheet" type="text/css" href="css/jQuery/astun/ui.all.css"  />
		
	</head>
	<body>
		<div id="atMyMaps" style="width: 800px;">
			<!-- #atMap -->
			<div id="atMap" class="atPanelContent">
				<div id="atInitialLoader" class="ui-state-default" style="padding: 10px; margin: 125px auto auto; text-align: center; width: 75px; font-family: Helvetica; -moz-border-radius: 5px; -webkit-border-radius: 5px;">Loading...</div>
			</div>
		</div>
		
		<div style="clear: both">&nbsp;</div>
		<div id="atPanelResults" style="display: none; padding: 5px; margin-top: 10px; font-size: 80%" class="ui-state-default ui-corner-all">
			<h3 style="margin: 5px">Map Information:</h3>
			<div id="atResults">Results</div>
		</div>
		<div style="clear: both">&nbsp;</div>
		<div id="lookup-results"></div>
		
		<a id="atPoweredBy" title="Powered by Astun Technology" href="http://www.astuntechnology.com">
			<img src="images/astun/poweredbyishare-online.png" height="18" width="175" style="border: 0" alt="Powered by Astun"/>
		</a>		
	</body>
</html>


This page just deals with the sections regarding the inclusion of a Selection Panel for information on the basic configuration of iShare Solo please see iShare Solo Map Example Code

1. Adding the Selection Panel

addSelectionPanel
soloMap.addSelectionPanel({ collapseInStart: false });

This needs to be positioned with the other panels in the order that you wish them to be displayed in iShare Solo. As with the other panels you may also change the title of this panel by including a title entry.

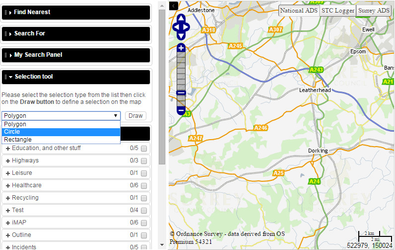
By default you will be give three selection types Polygon, Circle and Rectangle. You may limit this selection by adding another parameter selectionTypes. For example:

Specifying a selectionTypes parameter
SoloMap.addSelectionPanel({ collapseInStart: false, selectionTypes: ['Circle', 'Rectangle'] });

To allow all selection types you may either specify all or none.

2. Defining the Results area

Now we need to define the Lookup Results area. This is done by adding the following near the bottom of the html after the atPanelResults:

lookup-results
<div style="clear: both">&nbsp;</div>
<div id="lookup-results"></div>

3. Displaying the Results

The code to display the results needs to be included in the createMap call.

createMap: function(elementId, options, onLoad, onMapReady)

  • The elementId 'atMap' and options have been previously defined - see Set Map Options & Additional Features in the How to create your iShare Solo Map topic.
  • There is no onLoad event hence the null entry.
  • The onMapReady event is being used to display the results.
Display the results
soloMap.createMap('atMap', { themeName: 'base', mapSource: 'Workshop/AllMaps', view: { easting: 513052, northing: 152987, zoom: 50000 } }, null, function () {
	$eventElement.bind('astun:selectionComplete', function(event, results) {
		output = '';
		results = results.results;
					
		for (var i = 0; i < results.length; i++) {
			for (var j = 0; j < results[i].features.length; j++) {
				output += results[i].features[j].properties.html + '<hr />';
			}
		}
				
		jQuery('#lookup-results').html(output);
	});			
});