Styling your Annotation Layer
- Kim Stimpson
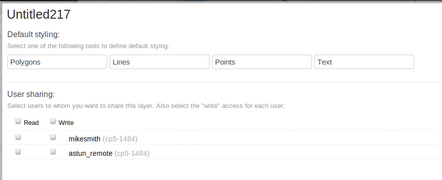
The Properties for an Annotation layer are displayed when you click on the Properties icon  in the Actions menu
  .
.
To change the Name click on it and you will be able to type a new name. To change the Default styling click on the type of object you wish to style. Default styling can be overridden for any specific object but it is probably quicker to set the styles that you are most likely to use first. Here you can also decide who is allowed to view / edit the Annotation layer under User sharing. |
|
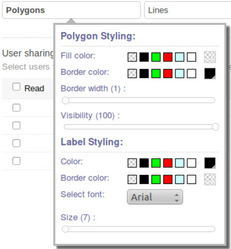
Polygon Styling Click on the Polygons button. Fill colour / Border colour Specifies the default Fill & Border colour for any polygons that are created in this annotation layer. Here you can either pick a colour from one of the preset colours or click on the the right hand entry which will allow you pick from a larger selection. Border width & Visibility Use the slider to decide the default Border width and Visibility for polygons. Label Styling These tools work as for the Polygon Styling except for the Font selection where you can select from the dropdown list and use the slider to set the size. |
|
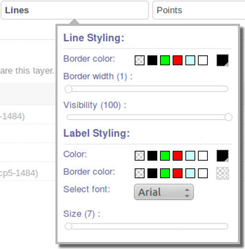
Line Styling Click on the Lines button. Border colour Specifies the default Border colour for any lines that are created in this annotation layer. Here you can either pick a colour from one of the preset colours or click on the the right hand entry which will allow you pick from a larger selection. Border width & Visibility Use the slider to decide the default Border width and Visibility for lines. Label Styling These tools work as for the Line Styling except for the Font selection where you can select from the dropdown list and use the slider to set the size. |
|
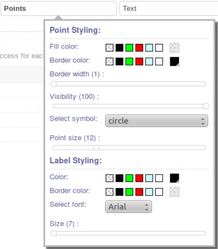
Point Styling Click on the Points button. Fill colour / Border colour Specifies the default Fill & Border colour for any points that are created in this annotation layer. Here you can either pick a colour from one of the preset colours or click on the the right hand entry which will allow you pick from a larger selection. Border width & Visibility Use the slider to decide the default Border width and Visibility for points. Select symbol & Point size Select the Symbol that you require for your points from the dropdown list and then select a Point size using the sliding scale. Label Styling These tools work as for the Point Styling except for the Font selection where you can select from the dropdown list and use the slider to set the size. |
|
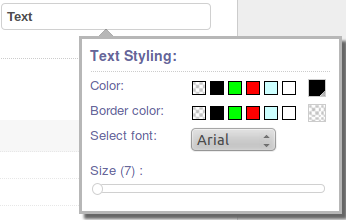
Text Styling Click on the Text button. Colour / Border colour Specifies the default Colour & Border colour for any text that is created in this annotation layer. Here you can either pick a colour from one of the preset colours or click on the the right hand entry which will allow you pick from a larger selection. Select font & Size Select the Font that you require for your text from the dropdown list and then select a Size using the sliding scale. |
|