Integrate iShare GIS with ADFS
Document history
| Date | |
|---|---|
| Author | Dan Ormsby |
| Comments | This document supersedes the following documents:
|
Contents
Introduction
This document provides details of how iShare GIS integrates with Active Directory Federated Services (ADFS). This integration allows customers using iShare GIS in the Cloud to authenticate their users against an on-premise Active Directory Service, and to provide single sign-on integration for iShare GIS users. The subsequent use of iShare GIS is then tailored according to the user permissions determined by that user's role.
How iShare GIS authenticates against ADFS
The diagram below shows the principle of how a user accessing iShare GIS is authenticated once the ADFS and iShare integration has been completed.
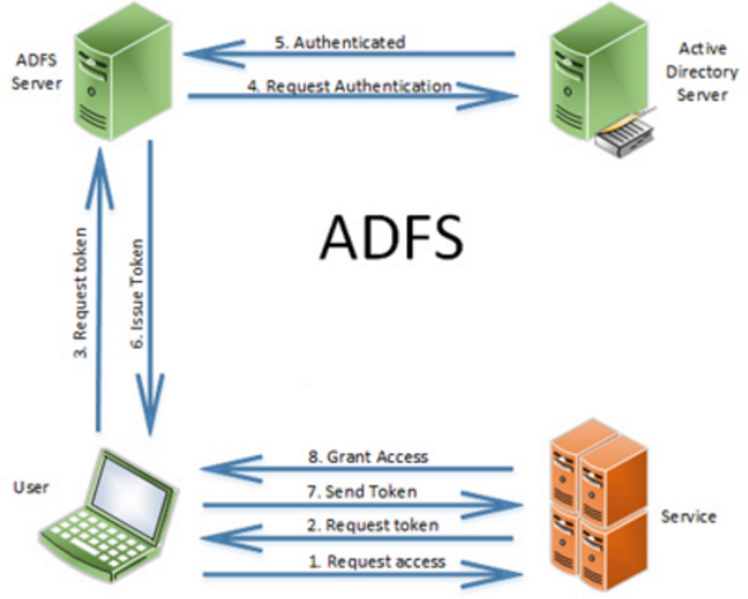
In the above diagram, "Service" would refer to iShare GIS. Therefore:
- The user visits the iShare GIS website to request access.
- iShare GIS returns a token to the users web browser.
- The users web browser sends the token to ADFS.
- ADFS makes an authentication request against the AD server.
- The AD server confirms that the user is authenticated.
- A token is issued by ADFS back to the user's web browser, which includes information that iShare GIS needs to understand about the user - for example what groups it is a member of.
- The user's web browser sends the token back to iShare GIS with details of the user's group membership.
- Access is granted. The specific details of the user's group membership determines the user's permissions in iShare GIS.
Overview of integration process
Integrating iShare GIS with ADFS requires 7 separate stages. It is important that they are all completed carefully as ADFS integration can be a challenge to troubleshoot!
| Stage | Stage name | Description | Responsibility |
|---|---|---|---|
| STAGE 1 | Pre-requisites | Before iShare GIS and ADFS are ready to be integrated with each other, the basic installation and configuration of both applications should be complete, and the networking infrastructure configured such that they are visible to one another. We would not recommend leaving any of these tasks in Stage 1 to be done in parallel with any of the tasks after Stage 1. Stage 1 is therefore to confirm that:
| Astun Customer |
| STAGE 2 | Configure ADFS so that iShare GIS is a Trusted Endpoint | This is the process the customer needs to go through to configure ADFS to confirm that the iShare GIS application is ‘trustworthy’. This process involves notifying ADFS of the URL where iShare GIS is hosted and running a tool to generate a metadata document (FederationMetadata.XML) which is subsequently used for configuration on the iShare server. | Customer |
| STAGE 3 | Set up ADFS Claims | The ‘claim’ in ADFS terminology, is the information that is sent to iShare GIS when the user is authenticated. The ‘claim’ therefore needs to be configured in ADFS to include the appropriate attributes that iShare needs, namely the user’s name and the user’s roles. The process of setting up the claims typically maps the user groups as they are defined in Active Directory with group roles on the iShare server. In this document we run through two examples for a typical iShare set up. Additional claims may need to be configured according to how AD groups are organised within your environment. | Customer |
| STAGE 4 | Set up Roles on iShare GIS server | This step involves setting up the appropriate roles and Windows User Groups on the iShare GIS server. These roles will map on to the ADFS claims that were set up in Stage 3, so that for each Outbound Role specified in ADFS, there is an equivalent role in iShare. | Astun |
| STAGE 5 | Configure iShare GIS to use ADFS authentication | This is the task undertaken on the iShare GIS server by the Astun consultant. In this stage, we are changing the authentication model so that authentication is made via the ADFS service and single sign-on, rather than by using local windows credentials with explicit user names and passwords. To do this the consultant will Run the Federation Utility which will acccess the FederationMetadata.XML document produced by the customer in Stage 3. | Astun |
| STAGE 6 | Astun Testing | Astun logs on to the customers Studio ETL server, to test the ADFS integration using the Astun user account within the customer AD domain. | Astun |
| STAGE 7 | Customer testing | Customer to test ADFS integration with variety of roles. This may be undertaken as part of UAT. | Customer |
Stage 1 - Pre-requisites (Customer and Astun)
Recap
Before iShare GIS and ADFS are ready to be integrated with each other, the basic installation and configuration of both applications should be complete and the networking infrastructure configured such that they are visible to one another. We would not recommend leaving any of these tasks in Stage 1 to be done in parallel with any of the tasks after Stage 1. Stage 1 is therefore to confirm that:
- iShare GIS has been set up and configured and is ready for integration
- ADFS has been set up and configured and is ready for integration
| Application pre-requisites | |
|---|---|
| iShare in the Cloud |
|
| Active Directory Federation Services |
|
Please note, it the above pre-requisites have not been met, then you should not proceed to the next stages.
Stage 2 - Configure ADFS so that iShare GIS is a Trusted Endpoint (Customer)
Recap
Stage 2 is the process the customer needs to go through to configure ADFS to confirm that the iShare GIS application is ‘trustworthy’.
The output of this process is the generation of an XML document called FederationMetadata.XML the URL of which should be supplied to the Astun consultant. Embedded within this is the Token Signing Certificate.
If the customer also requires the tokens to be encrypted then a Token Encryption Certificate will also need to be supplied.
2.1 ADFS Relying Party Trust
See: https://docs.microsoft.com/en-us/windows-server/identity/ad-fs/operations/create-a-relying-party-trust for details of how to setup a Relying Party Trust in the current version on ADFS on Windows 2016, which is how iShare GIS will operate in an ADFS environment. The method will be similar but not identical in Windows 2012 and Windows 2008.
While configuring ADFS itself is outside of the scope of iShare documentation or consultancy, the following are what we understand are the necessary steps to enable iShare GIS to be a Relying Party Trust:
- Enter data about the replying party manually
- Specify a display name e.g. "Astun iShare GIS".
- If an option, choose "ADFS profile" & not "ADFS 1.0 / 1.1 profile".
- If specifying an optional Token Encryption Certificate the private key will need to be passed to Astun.
- Enable support for the WS-Federation Passive protocol. SAML 2.0 WebSSO protocol can be ignored.
- Add the iShare GIS application URL as the Replying party trust identifier (see 2.2).
- Permit everyone to access this relying party (but do not configure multi-factor authentication settings).
Once the trust has been configured, pass the Federation Metadata document URL - or file, if the iShare GIS server cannot access your ADFS service or ADFS proxy directly - to the consultant setting up iShare GIS (see 2.4).
2.2 Relying Party Identifier
The Relying Party Identifier in ADFS for iShare GIS is just the web application's path, e.g.: https://gis.domain.name/. Unless the iShare web application is always going to be served via the same IP address, this should be configured after the server has been given a permanent DNS name that clients will use.
Note: The iShareGIS URL must end with a forward slash in both the 'Endpoints' tab and the 'Identifiers' tab. If it does not, then login attempts will fail with a 405 error: "HTTP verb used to access this page is not allowed".
2.3 Recommended Token Lifetime
By default ADFS will expire users' ADFS sessions after an hour. This will cause issues in iShareGIS as it intercepts responses to the browser to try and redirect the application to the ADFS service. While the issue can then be resolved by refreshing the page in the browser, we recommend increasing this value to eight hours, which should cover a day's worth of activity. Unfortunately this setting is not currently configurable through the ADFS administrative applications, but has to be set through Powershell on the server that runs the ADFS service, e.g.:
Set-ADFSRelyingPartyTrust -Targetname "https://server.domain.name/ishare.web/" -TokenLifetime 480
See: https://docs.microsoft.com/en-us/powershell/module/adfs/set-adfsrelyingpartytrust?view=win10-ps
2.4 Supply FederationMetadata.XML URL or file and certificates to Astun
Finally
- Preferably Supply the Astun consultant with the URL of the FederationMetadata.XML (this allows automatic updates of certificates)
- Alternatively Supply the Astun consultant the FederationMetadata.XML file itself (this will require manual intervention by an ADFS administrator and an iShare server administrator when certificates get replaced)
In either case the Token Signing Certificate thumbprint is contained within the FederationMetadata.xml document)
Then:
- Either Supply any Root Certificate Authority & Intermediary certificates for the ADFS token signing service
- Or Notify Astun via Basecamp that the Token Signing Certificate is self-signed and that you (the customer) accept responsibility for any security risk.
If option for token encryption was selected you should also:
- Specify which certificate to use. This could be the STS certificate or the iShare GIS site certificate. If it is decided to use another certificate it must be provided.
Stage 3 - Set up the ADFS Claims (Customer)
Recap
The ‘claim’ in ADFS terminology, is the information that is sent to iShare GIS when the user is authenticated. The ‘claim’ therefore needs to be configured in ADFS to include the appropriate attributes that iShare needs, namely the user’s name and the user’s role. The process of setting up the claims also maps the user groups as they are defined in Active Directory with group roles on the iShare server (the latter being set up in Stage 4). In this document we run through two examples for a typical iShare set up. Additional claims may be need to be configured according to how AD groups are organised within your environment.
Naming convention
Note: The inclusion of an ampersand (&) in any group names, whether or not they are being used in iShare, will cause an error in iShare as the ampersand will be taken as a parameter separator, so these groups should be renamed or excluded by using custom rules to filter the groups. Use option 3.2 below if any group names in your directory contain an ampersand (&).
Option 3.1 Example claim rules ("issuance transform rules") for iShare GIS
The example described in the table below are the steps that would be required to set up an ADFS / iShare GIS integration in which:
- User’s names would be passed from ADFS to iShare (e.g. for use in annotation)
- User’s roles would be passed from ADFS to iShare (e.g. for permissions)
- An AD group called “GIS Users”, would map on to an iShare role called “iShareUsers”
- An AD group called “GIS Editors”, would map on to an iShare role called “iShareEditors”
- An AD group called “GIS Administrators”, would map on to an iShare role called “iShareAdmin”
The iShare roles would then be used to define the specific permissions within the iShare environment of members of each of those roles.
The following are simply examples and you may have different Group Names so "PLEASE ASK YOUR CONSULTANT FOR THE ACTUAL NAMES OF THE GROUPS".
| Step | Instructions | Complete |
|---|---|---|
Step 1 - Set up AD groups | For example, you could set up AD groups called:
Then assign your team members to those AD groups. Note The above example is a typical set up which would allow us to test the iShare GIS / ADFS integration. If you already have existing AD groups that are similar to GIS Users / GIS Editors / GIS Administrators, but are named differently, then these can be mapped accordingly. The groups above are referenced throughout this document, so remember to substitute these with your existing AD group names if going down this route as per step 8. More information on this is contained below this table. | |
Step 2 - Add Astun test user to the above groups | You should have already set up an Astun user on your domain for testing purposes. Please add the Astun user to the above groups so that we can test the integration whilst we complete our steps. | |
| Step 3 - Pass through Name claims | Follow the guidance document at: Set up as follows:
| |
Step 4 - Pass through Role claims | Follow the guidance document at: Set up as follows:
| |
Step 5 - Send GIS Users Group as iShareUsers Role | Follow the guidance document at: Set up as follows
| |
Step 6 - Send GIS Editors Group as iShareEditors Role | Follow the guidance document at: Set up as follows:
| |
Step 7 - Send GIS Administrators Group as iShareAdmin Role | Follow the guidance document at: Set up as follows
| |
| Step 8 - Other roles |
|
End result
At the end of this process ADFS will be configured to map the following AD groups to the following Windows Groups on the iShare GIS server.
| AD group | Windows Group |
|---|---|
| GIS users | iShareUsers |
| GIS editors | iShareEditors |
| GIS administrators | iShareAdmin |
NOTE: The above example is a typical set up which would allow us to test the iShare GIS / ADFS integration. If you already have existing AD groups that are similar to GIS Users / GIS Editors / GIS Administrators, but are named differently, then these can be mapped accordingly. If so you need to:
- Fill out a table as above, with details of the AD group and iShare roles, and share with the Astun consultant
- Add the Astun test user into the groups (as per Step 2)
- Adapt Steps 5, 6 and 7, with appropriate changes to the User's group and Outgoing claim value
Additional groups can also be defined in a similar way - e.g. if you wish to organise roles around business areas / departments (e.g. “Planning”, “Social Services”, “Education” etc.).
Option 3.2 Example custom claim rules ("issuance transform rules") for iShare GIS
The example described in the table below are the steps that would be required to set up an ADFS / iShare GIS integration in which:
- User’s names would be passed from ADFS to iShare (e.g. for use in annotation)
- User’s roles would be passed from ADFS to iShare (e.g. for permissions)
- Only AD group prefixed with a common prefix are mapped to iShare roles.
- AD groups and roles will have the same name.
The iShare roles would then be used to define the specific permissions within the iShare environment of members of each of those roles. The advantage of this custom claim rule setup is that there is no further ADFS configuration to occur in the event of additional AD groups to be passed to iShare. Any AD group with a matching prefix will be included as a role.
| Step | Instructions | Complete |
|---|---|---|
Step 1 - Set up AD groups | Set up AD groups called:
Assign your team members to those AD groups. | |
Step 2 - Add Astun test user to the above groups | You should already have set up an Astun user on your domain for testing purposes. Please add the Astun user to the above groups so that we can test the integration whilst we complete our steps. | |
| Step 3 - Pass through Name claims | Follow the guidance document at: Set up as follows:
| |
Step 4 - Create Custom Rule to get all groups | Set up as follows:
c:[Type == "http://schemas.microsoft.com/ws/2008/06/identity/claims/windowsaccountname", Issuer == "AD AUTHORITY"] => add(store = "Active Directory", types = ("http://schemas.microsoft.com/ws/2008/06/identity/claims/role"), query = ";tokenGroups;{0}", param = c.Value); | |
Step 5 - Create Custom Rule to filter groups | Set up as follows:
c:[Type == "http://schemas.microsoft.com/ws/2008/06/identity/claims/role", Value =~ "(?i)^iShareGIS_.*"] => issue(claim = c); |
End result
At the end of this process ADFS will be configured to map the following AD groups to the following Windows Groups on the iShare GIS server.
| AD group | Windows Group |
|---|---|
| iShareGIS_Users | iShareGIS_Users |
| iShareGIS_Editors | iShareGIS_Editors |
| iShareGIS_Administrators | iShareGIS_Administrators |
NOTE: In this example any additional AD groups that exist with the same prefix will also be passed to iShare GIS. Any AD group that does not have a matching role defined on the iShare GIS server will be ignored.
Stage 4 - Set up roles on iShare GIS server (Astun)
Recap
This step involves setting up the appropriate roles and Windows Groups on the iShare GIS server. These roles will map on to the ADFS claims that were set up in Stage 3, so that for each Outbound Role specified in ADFS, there is an equivalent Windows Group on the iShare GIS server, mapped to an appropriate role in iShare.
The iShare roles and associated Windows Groups will then need to be set up on the iShare Server, as per Roles Editor. The Windows Group names must match the values of the Outgoing Claims listed above, namely iShareUsers, iShareEditors, iShareAdmin. The iShare Role names can in theory be different, but for simplicity it is recommended that they are the same. If a different set of values has been agreed with the customer, then attention will be needed to ensure that these are set up to match the outgoing claim values. If additional roles have been set up by the customer then these should also be added (matching the Outbound Role name) or guidance provided to the customer in how to do this themselves.
Note
This is no different to the process of setting up roles and Windows Groups for locally authenticated users, other than on the iShare GIS server itself, there will be no user members of the Windows Groups, as these will effectively come from the customers' AD environment.
Stage 5 - Configure iShare GIS web application to use ADFS authentication
Recap
These are the tasks undertaken on the iShare GIS server by the Astun consultant. In this stage, we are essentialy changing the authentication model so that it uses authentication via the ADFS service and single sign-on, rather than using local windows credentials with explicit user names and passwords. To do this the consultant will Run the Federation Utility which will acccess the FederationMetadata.XML document via URL produced by the customer in Stage 3.
| Step | Notes |
|---|---|
Step 1 - Check iShare GIS config | Before starting, check that:
|
| Step 2 - Install the Windows Identity Framework and SDK | The Windows Identity Framework is required by iShare for the token exchange. The SDK includes the Federation Utility Wizard used in Step 4. Both therefore need to be installed.
Install-WindowsFeature Windows-Identity-Foundation
|
| Step 3 - Configure IIS |
|
| Step 4 - Certificate installation | Note If the customer is using a self-signed Token Signing certificate or public CA, this step can be skipped. If not, follow the actions below to install any Root Certificate Authority & Intermediary certificates supplied by the customer. Most often self-issued certificates are used but sometimes they must be imported from ADFS, if so:
|
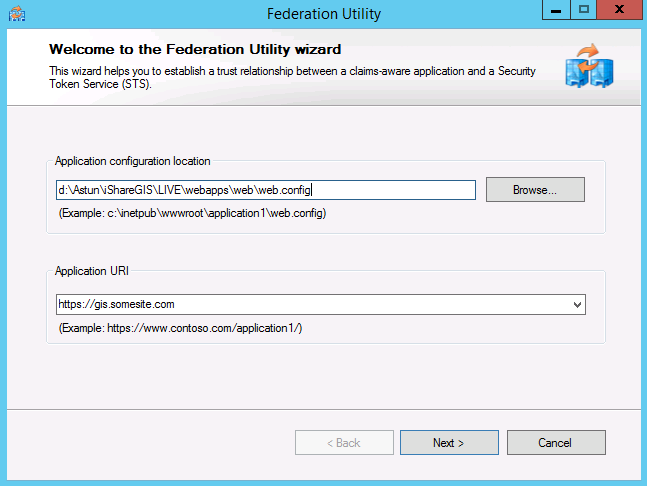
| Step 5 - Run the Federation Utility Wizard | Start the wizard The Federation Utility Wizard ( Run the Federation Utility Wizard as an Administrator. This is most important as it allows a scheduled task to keep the federation metadata documents up to date. |
Screen 1 - Welcome Enter the application configuration location (the web.config) and the Application URI (https://gis.somesite.com)
| |
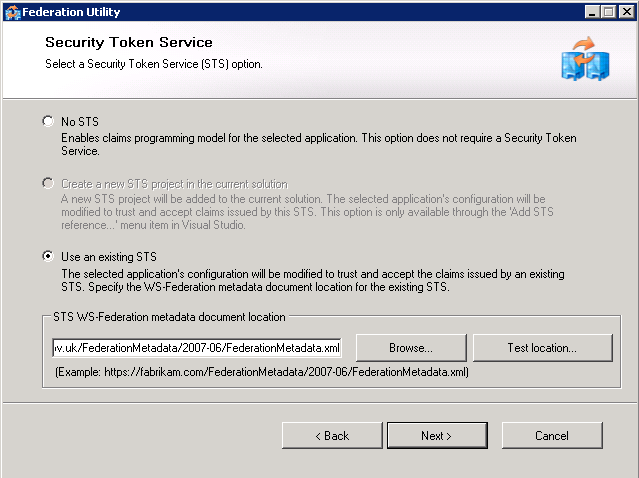
Screen 2 - Security Token Service From Stage 2, the customer should provide us with the URL of a FederationMetadata.xml file, enter that in STS WS-Federation metadata document location. The URL will follow this structure: https://<FQDN>/federationmetadata/2007-06/federationmetadata.xml. NOTE: In some circumstances the customer does not make their ADFS proxy available to us, in that situation they must download the file themselves and send it to us, save it to the {{WebApps}} folder for the iShare GIS installation and then enter the document's local path in here instead of a URL. Always click Test location... this will ensure that the file can be reached.
| |
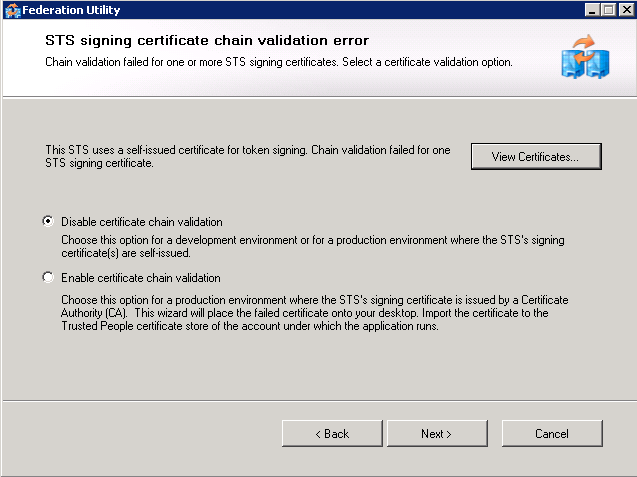
Screen 3 - STS signing certificate chain validation error Note This screen only appears when the certificate chain validation fails. This screen will appear if the certificate chain cannot be validated all the way back to the root Certificate Authority (CA). This will happen if the certificate was self-issued or if the CA is not one trusted by the server (e.g. an Active Directory CA when the iShare server is not part of the Active Directory). At this point there are three choices:
At this point Check that the customer gave explicit confirmation (in Stage 2, 2.2) that they accept any risk of using self signed certificates without chain validation and select option 1 (Disable). Or obtain the Root and any Intermediate certificates from the customer (or via instructions in Appendix B) and follow the steps to install the certificate described in Stage 5, step 4. | |
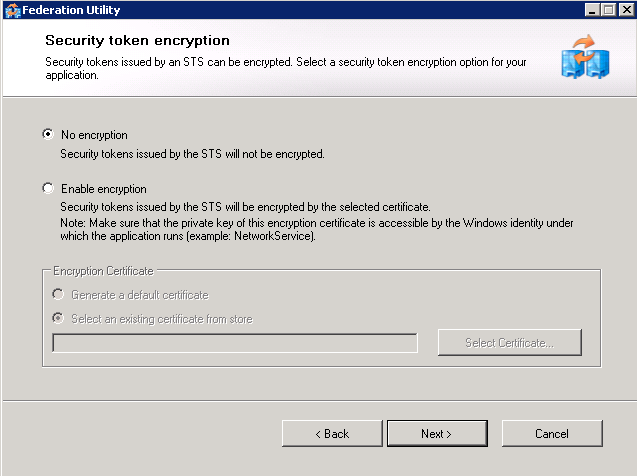
Screen 4 If encryption was chosen in the ADFS Relying Party configuration then enable encryption. If they have provided the private key of the token encryption certificate it should be selected here. After the Federation Utility has been completed allow the iShare GIS web application pool access to the certificate through MMC's Certificates snap-in.
| |
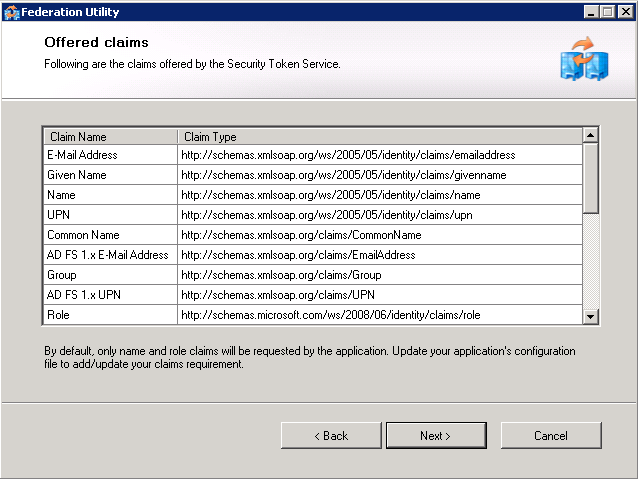
Screen 5 - Offered clains The utility now presents a series of claims offered by the Security Token Service. All look good? Click next.
| |
Screen 6 - Scheduled task Select scheduled task. This is only effective if the STS federation metadata document (see Screen 2) has been supplied via URL. This is most important as otherwise the trust will eventually break down when certificates expire. Copy the configuration summary to the iShare GIS module page in the client notes. | |
Additional Tasks Check Windows Task Scheduler for the WIF task. This will be under Task Scheduler Library > Microsoft > Windows > WindowsIdentityFoundation. You may wish to run this to see if it completes correctly. Did you specify a certificate for security token encryption? If so you will have to allow the iShare GIS web application pool read access to the certificate. Do this by running MMC > Local Computer > Certificates snap-in > Select certificate > Right click Manage Private Keys. Add application pool user account. If required, add logging to the web.config file for the web application - this can be done by adding the following top-level element to the XML, at the end of the file: The generated log will show details of users and claims. Note that this log can grow very large, so the code above should be disabled when not needed. |
Stage 6 - Testing by Astun
- Check that the iShare GIS site can be accessed from the Astun account, and that core functionality is working, including
Stage 7 - Testing by Customer
- Access the site, and test that core functionality is working
- Assign a different test user to each of the initial AD groups
- Create test Map Sources in iShare GIS
- In iShare Studio, allocate each of the iShare Roles which correspond to the initial groups to a different Map Source (do not use the default Map Source for this)
- Log in as each user in turn and check that they are able to see the Map Sources (Profiles on the iShare menu) and only the Map Sources to which their Roles have been allocated, bearing in mind that all users should be able to see the default Map Source
- Set up a layer for editing in one of the Map Sources, and test that users in Roles which are allocated to editing the layer are able to edit, and other users are not
Appendix A - Frequently Asked Questions
Where can we find out more information about ADFS?
- Microsoft Technical Blog, planning - https://blogs.technet.microsoft.com/askpfeplat/2015/01/26/adfs-deep-dive-certificate-planning/
- Microsoft Technical Blog, certificates - https://blogs.technet.microsoft.com/adfs/2007/07/23/adfs-certificates-ssl-token-signing-and-client-authentication-certs/
What certificates are required for ADFS and iShare integration?
There are a number of certificates that are involved in the integration between ADFS and iShare and each one serves a different purpose. These are summarised in the table below.
| Certificate | Purpose |
|---|---|
| iShare GIS SSL Certificate | iShare must run under https as pre-requisite for ADFS integration. An SSL certificate for your iShare GIS site will need to be provided in order to set this up. |
| Token Signing Certificate | The token is what exchanges the credentials between ADFS and iShare - i.e. confirmation that the user is authenticated, plus their name, roles etc (as per the Claims set up). The Token Signing Certificate is used to sign the ADFS authentication token and to verify that the token exchange between iShare and ADFS has not been tampered with en route. The thumbprint of the Token Signing Certificate is embedded in the FederationMetadata.XML document and does not need to be explicitly provided. |
| Token Encryption Certificate | A certificate for optionally encrypting the returned token. |
Appendix B - Obtaining Root Certificates from ADCS
This is a workaround for Stage 5, Step 4 (in the table) if the cusotmer has not provided you with the Root and Intermediary certificates.
Obtaining the Root CA certificate via ADCS webpage
Browse to the/certservURL on the issuing server, e.g.:
https://url.of.certificate.server/certserv
- Click Download a CA certificate, certificate chain, or CRL
- Accept any digital certificate operation dialogs and if there's more than one certificate listed, you should have been told which one to pick
- Click Download CA certificate and save the resulting certnew.cer to somewhere sensible
Obtaining a certificate via ADCS webpage
Once you have imported the Root CA certificate, browse to the /certserv URL on the issuing server, e.g.:
https://url.of.certificate.server/certserv
- Click Request a certificate, advanced certificate request and then Create and submit a request to this CA.
- Accept any prompts to allow the digital certificate operation
- You should have been told which Certificate Template to select at this point (e.g. "iShare Webapp")
- Under Identifying Information enter the domain name of the local web application server into the Name field. The other fields in this section can be left blank.
- Enter something useful into Friendly Name under Additional Options.
- Click Submit
- On the following page click Install this certificate
At this point the certificate will have been installed under your user account from which it will need to be exported before continuing with the setup process.
- If not already running, load the Certificates MMC console
- If not already present, add the Current User certificates snap-in (File->Add/Remove Snap-in...->Certificates->Add > and then select My user account)
- Expand Certificates - Current User then Personal and select Certificates
- Right-click the certificate with Issued To equal to the value of the Name field in step 4 of the certificate download process above
- Select Export...
- Go through the wizard: select Yes, export the private key, leave the defaults on Export File Format, enter and confirm a password and then save the file to a sensible local location