Highlight a Feature in a Layer
- Kim Stimpson
- Gavin Kelly
- Simon Chapman
- Andrew Bailey
iShare can be configured to highlight a particular feature in a layer simply by passing the relevant information such as the tab to display; Search layer; Search field and Search value; as parameters in the URL.
This can be useful if you wish to display a map from another application. For instance you may wish to highlight a particular Planning Application e.g.:
http://my.mycouncil.gov.uk/iShare/mycouncil.aspx?tab=maps&SearchLayer=planning_filter&SearchField=PAPP_NO&SearchValue=06/1374
The above example link will display the Maps tab showing the Planning application for 06/1234 e.g.
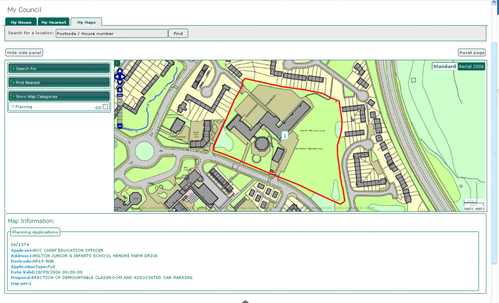
The Map Information area at the bottom of the screen will display the details of the Planning Application or whatever other feature you are querying.
(It is also possible to switch other layers on by adding the Layers parameter to the URL, for example
http://my.mycouncil.gov.uk/iShare/mycouncil.aspx?tab=maps&SearchLayer=planning_filter&SearchField=PAPP_NO&SearchValue=06/1374&Layers=PlanningAppsAll
which would also turn on the 'PlanningAppsAll' layer and allow the end user to see the highlighted planning application within the context of all planning applications).
Step-by-step guide
In order for the query function to work you will first need to make some changes to the .MAP file for the Map Source.
- You will need to add a QUERYMAP section to the .MAP file which must be added BEFORE the LAYER configuration entries. This lets MapServer know to draw a layer when you query the map.
QUERYMAP
		COLOR 255 0 0
		STATUS ON
		SIZE -1 -1
		STYLE hilite
END
| Element | Description | Values |
|---|---|---|
| STATUS | Whether the QUERYMAP is shown or not. This needs to be ON for the layer to be displayed. | ON OFF |
| STYLE | HILITE - Draws selected features using COLOR. Non-selected features are drawn normally. NORMAL | NORMAL HILITE SELECTED |
| COLOR | RGB settings for the border of the polygon. | e.g. 255 255 0 |
| SIZE | Size of the map in pixels. Defaults to the size defined in the map object. |
- Next, for each LAYER on which you wish to be able to highlight a feature, you will first need to copy the existing information for the LAYER in the .MAP file and paste it at the end of your LAYER entries as this wants to be the last layer to be drawn.
In this example we have two Planning layers, one for all Planning Applications and one to just include those for 2010. We will copy the layer containing ALL Planning Application and change the NAME to be "planning_filter".
LAYER
	CONNECTION "Overlays\Planning\PlanningApplicationsAll.tab"
	CONNECTIONTYPE OGR
	METADATA
            "ows_title" "something"
            "wms_title" "something"
        END
        VALIDATION
            "qstring" "."
        END
	NAME "planning_filter"
	FILTER (PAPP_NO='%qstr%')
	STATUS OFF
	TYPE POLYGON
	UNITS METERS
	CLASS
		STYLE
			OUTLINECOLOR 255 0 0
			WIDTH 4
		END
	END
END
You will need to add the following information which we have extracted from the example above.
| .MAP Entry | Description |
|---|---|
"ows_title" | ows title |
| "wms_title" | wms title |
NAME "planning_filter" | This entry defines the Layer Name that will be used in the URL. |
FILTER (PAPP_NO='%qstr%') | This entry defines the field in the search layer that will be used to search on e.g. PAPP_NO. (iShare version 5.8) |
| FILTER ('[PAPP_NO]' = '%qstr%') | This entry defines the field in the search layer that will be used to search on e.g. PAPP_NO. (iShare version 6.0+) |
STYLE OUTLINECOLOR 255 0 0 WIDTH 4 END | OUTLINECOLOR defines the colour of the outline. In this case Red. WIDTH defines the width of the line. |
Sample .MAP file
MAP
	# EXTENT 480000 149000 504600 169000 # Tile Cache
	EXTENT 329671.360270 186220.264259 338347.489656 190100.533544
	TEMPLATEPATTERN "."
	IMAGECOLOR 255 255 255
	IMAGETYPE AGG_Q
	FONTSET "D:/mapserver/cgi-bin5.6/shared/fonts/fonts.list"
	SYMBOLSET "D:/mapserver/cgi-bin5.6/shared/symbols/symbols.sym"
	SHAPEPATH "D:\iShareData\Maps\MyCouncil\"
	SIZE 512 512
	MAXSIZE 8192
	UNITS METERS
	CONFIG MS_ERRORFILE "D:/mapserver/tmp/debug.log"
	NAME "WrkShp"
	DEBUG 1
	OUTPUTFORMAT
		NAME "AGG_Q"
		MIMETYPE "image/png; mode=24bit"
		DRIVER "AGG/PNG"
		EXTENSION "png"
		IMAGEMODE "RGB"
		TRANSPARENT TRUE
		FORMATOPTION "TRANSPARENT=ON"
	END
	OUTPUTFORMAT
		NAME "AGG_JPEG"
		MIMETYPE "image/jpeg"
		DRIVER "AGG/JPEG"
		EXTENSION "JPG"
		IMAGEMODE "RGBA"
		TRANSPARENT TRUE
		FORMATOPTION "TRANSPARENT=ON"
		FORMATOPTION "interlace=off"
	END
	WEB
		IMAGEPATH "D:\mapserver\tmp\"
		IMAGEURL ""
		LOG "D:\mapserver\tmp\ms.log"
		# QUERYFORMAT text/html
		# LEGENDFORMAT text/html
		# BROWSEFORMAT text/html
		TEMPLATE "globexml.xml"
	END

	QUERYMAP
		COLOR 255 0 0
		STATUS ON
		SIZE -1 -1
		STYLE hilite
	END

## Overlays Start Here ##
	LAYER
		CONNECTION "Overlays\Planning\PlanningApplicationsAll.tab"
		CONNECTIONTYPE OGR
		METADATA
            "ows_title" "planning applications"
            "wms_title" "planning applications"
        END
        VALIDATION
            "qstring" "."
        END
		NAME "PlanningAppsAll"
		STATUS OFF
		TYPE POLYGON
		UNITS METERS
		CLASS
			STYLE
				OUTLINECOLOR 95 121 207
				WIDTH 2
			END
			STYLE
				COLOR 95 121 207
				OPACITY 10
			END
		END
	END
	LAYER
		CONNECTION "Overlays\Planning\PlanningApplications10.tab"
		CONNECTIONTYPE OGR
		METADATA
            "ows_title" "planning applications"
            "wms_title" "planning applications"
        END
        VALIDATION
            "qstring" "."
        END
		NAME "PlanningApps2010"
		STATUS OFF
		TYPE POLYGON
		UNITS METERS
		CLASS
			STYLE
				OUTLINECOLOR 158 8 28
				WIDTH 2
			END
			STYLE
				COLOR 158 8 28
				OPACITY 10
			END
		END
	END
	LAYER
		CONNECTION "Overlays\Planning\PlanningApplicationsAll.tab"
		CONNECTIONTYPE OGR
		METADATA
            "ows_title" "planning applications"
            "wms_title" "planning applications"
        END
        VALIDATION
            "qstring" "."
        END
		NAME "planning_filter"
		FILTER (PAPP_NO='%qstr%')
		STATUS OFF
		TYPE POLYGON
		UNITS METERS
		CLASS
			STYLE
				OUTLINECOLOR 255 0 0
				WIDTH 4
			END
			#STYLE
				# COLOR 95 121 207
				# OPACITY 30
			#END
		END
	END
END
Studio Configuration
The "planning_filter" layer will need to be configured as an iShare Layer within Studio with the 'Info Click', 'Visible on Startup' and 'Can Be Activated' de-selected as per the screenshot example below.
