Export your Annotation Layers
- Kim Stimpson
Overview
You may have spent a lot of time creating an Annotation Layer in iShare GIS and then wish to use this as a regular layer in iShare. Annotation Layers are defined by individual Users with varying styles within iShare GIS and are shared when required with other users. Annotation Layers can contain multiple Geometry types e.g. polygon, line and point data and so these must be extracted by type if you wish to use them in iShare. If you wish to extract the information to use in a GIS application that supports multiple geometry types such as MapInfo then this is also possible.
No attempt to capture individual styles for each set will be made as these could differ for each user. Furthermore no attempt is made to retain the permissions data on each of the bespoke annotation layers.
The Annotation data is held in the annotations schema in your iShare database and there are various Views over the tables which may be used to extract the data.
Step-by-step guide
Step 1 - Create a Schema to hold your Annotation data
If you don't already have a schema in the iShare database to hold custom information then you need to create one as you must not use an Astun schemas as these could get replaced when you migrate to a newer version of iShare and it is better practice not to use the public schema.
For the purposes of our examples we have used a schema called workshop so you will need to replace workshop with the name of the schema you have created for your Annotation data.
Step 2 - Create the Tables in your Schema
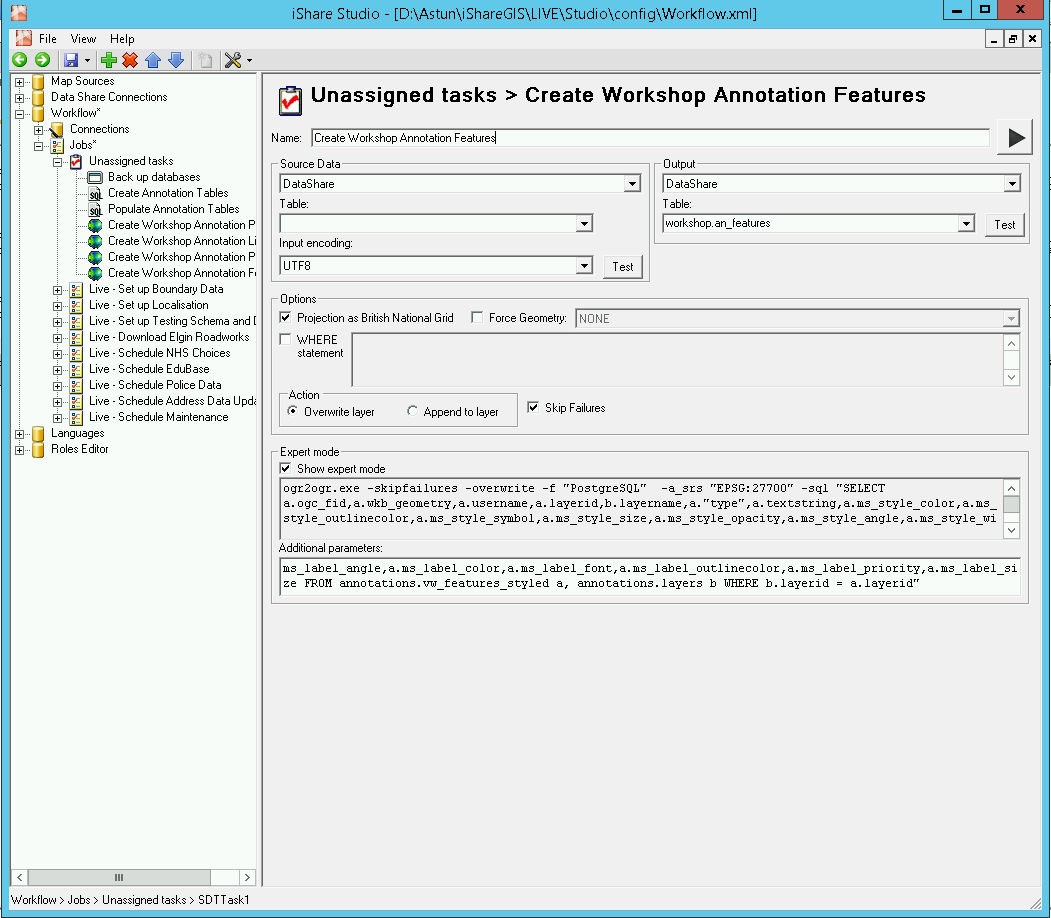
We will use the existing Views in the Annotations schema and join to the layers table to retrieve the Layer Name as this is not held in the Views. This is easily achieved by using the Spatial Data Transformation Task in Studio Workflow. iShare requires tables that only contain one geometry type so we will create separate tables for Polygon, Line, and Point data but other GIS applications can support multiple geometry types so we will also create a Features table containing all of the data.
- These steps cover exporting all Layers but you may only want to export one specific Layer. If this is the case then first find the Layer ID (scratch_id) from the annotations.layers table and then you can add it to the relevant select statements below.
- Once you have exported the features from your Annotation Layer you would probably want to remove those features from the relevant Annotation Layer.
Create Annotation Polygons table
Here we will create a new table in the workshop schema to hold the Annotation Polygon data.
- In Studio Workflow select to create a Task either under the Unassigned tasks or under a specific Job if you have created one for this purpose.
- Select the Spatial Data Transformation type.
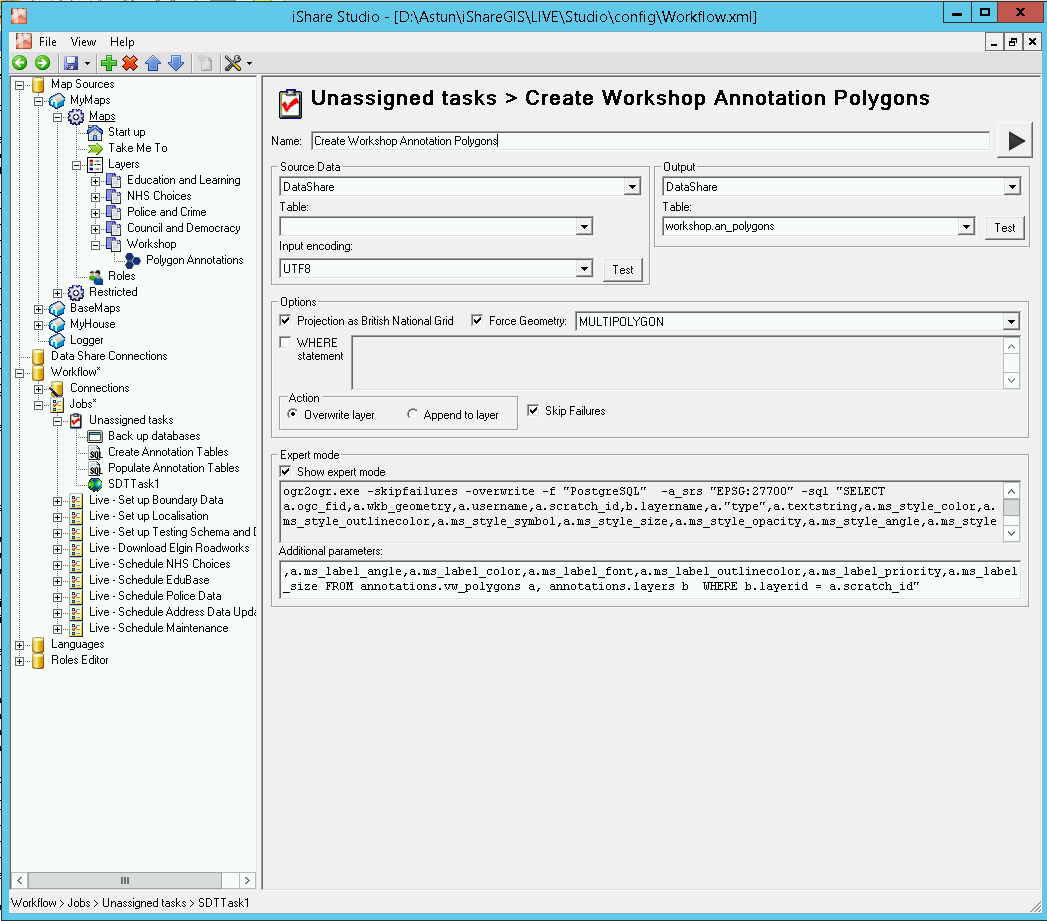
- Output is your DataShare database and specify the Table e.g. workshop.an_polygons.
- Tick the Force Geometry and pick MULTIPOLYGON from the list.
- Tick Show expert mode and past the following in the Additional parameters.
- Run the Task to create and populate the table.
- Save your changes.
Create Annotation Lines table
Here we will create a new table in the workshop schema to hold the Annotation Line data.
- In Studio Workflow select to create a Task either under the Unassigned tasks or under a specific Job if you have created one for this purpose.
- Select the Spatial Data Transformation type.
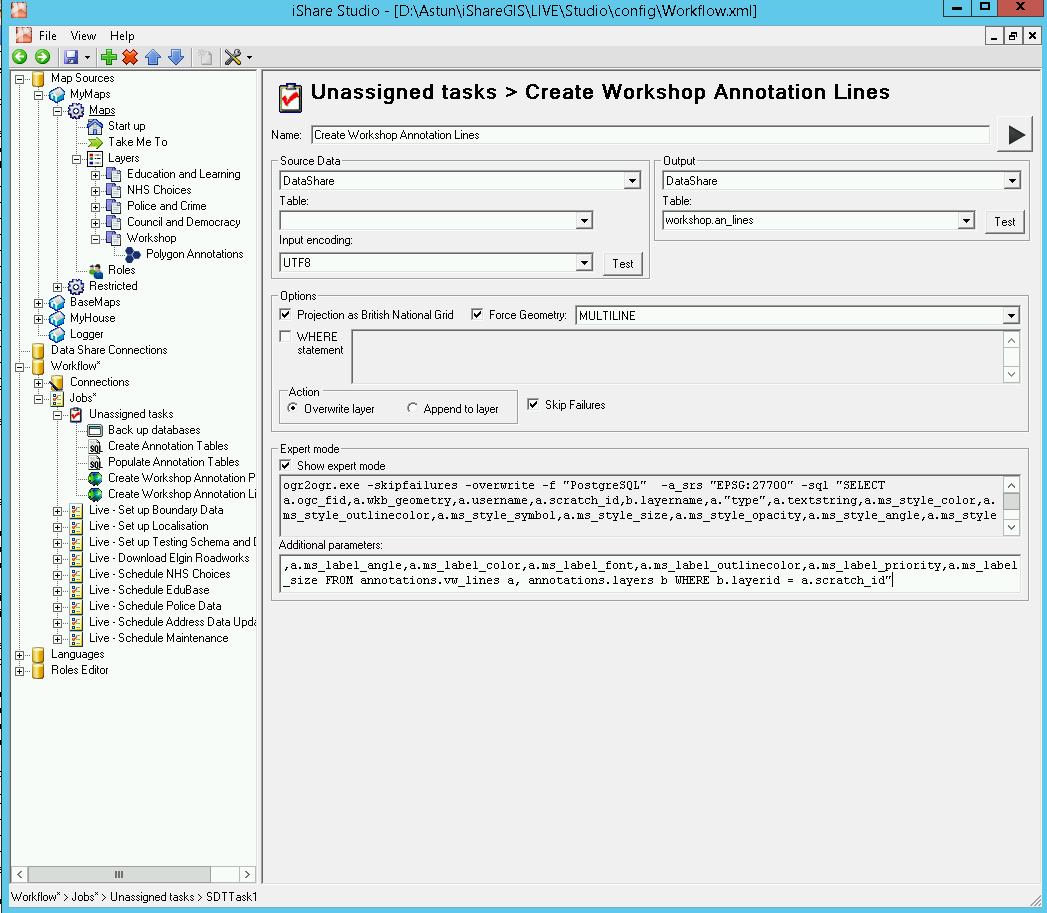
- Output is your DataShare database and specify the Table e.g. workshop.an_lines.
- Tick the Force Geometry and pick MULTILINESTRING from the list.
- Tick Show expert mode and past the following in the Additional parameters.
- Run the Task to create and populate the table.
- Save your changes.
Create Annotation Points table
Here we will create a new table in the workshop schema to hold the Annotation Point data.
- In Studio Workflow select to create a Task either under the Unassigned tasks or under a specific Job if you have created one for this purpose.
- Select the Spatial Data Transformation type.
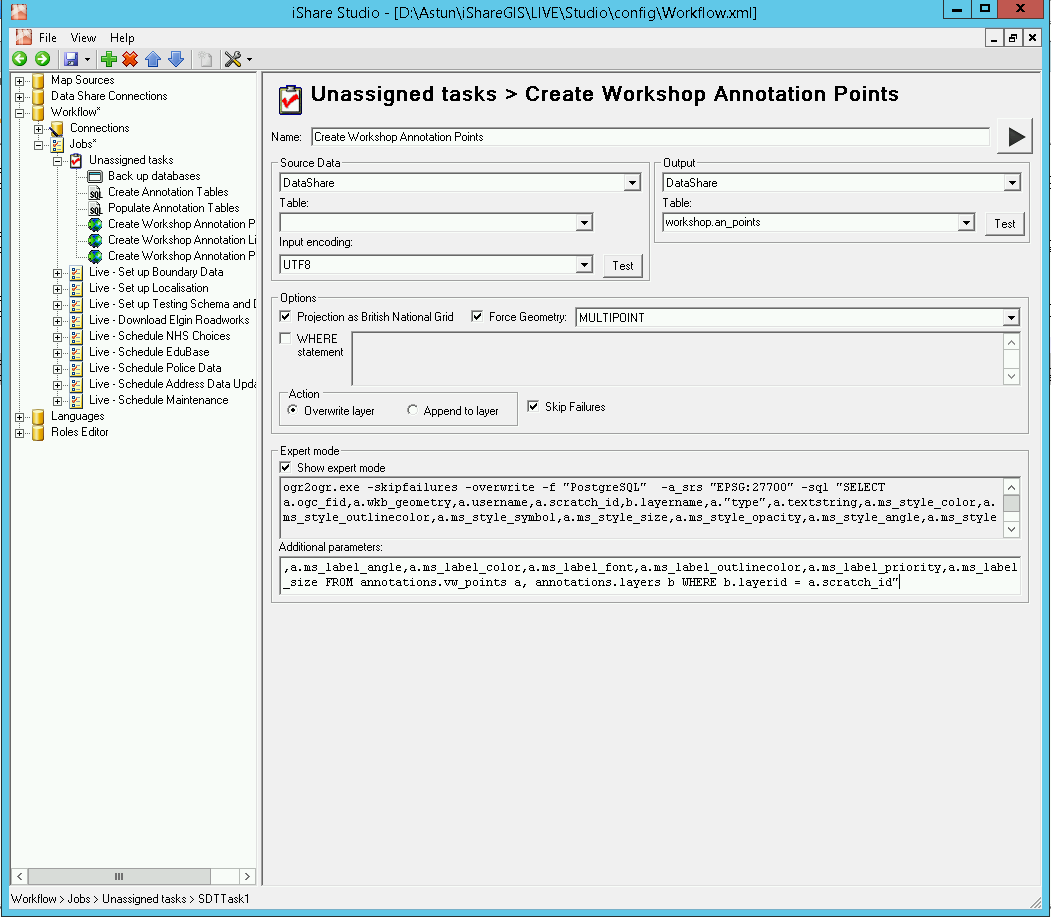
- Output is your DataShare database and specify the Table e.g. workshop.an_points.
- Tick the Force Geometry and pick MULTIPOINT from the list.
- Tick Show expert mode and past the following in the Additional parameters.
- Run the Task to create and populate the table.
- Save your changes.
Step 3 - Create the Standard Layers in Studio
When you create your Standard Layers in Studio you may wish to extract the information for a specific Annotation Layer and this can be done by Modifying the SQL when you create the Layer. The scratch_id field is actually the layerid i.e. the unique key for the Annotation Layer so your SQL would be something like...
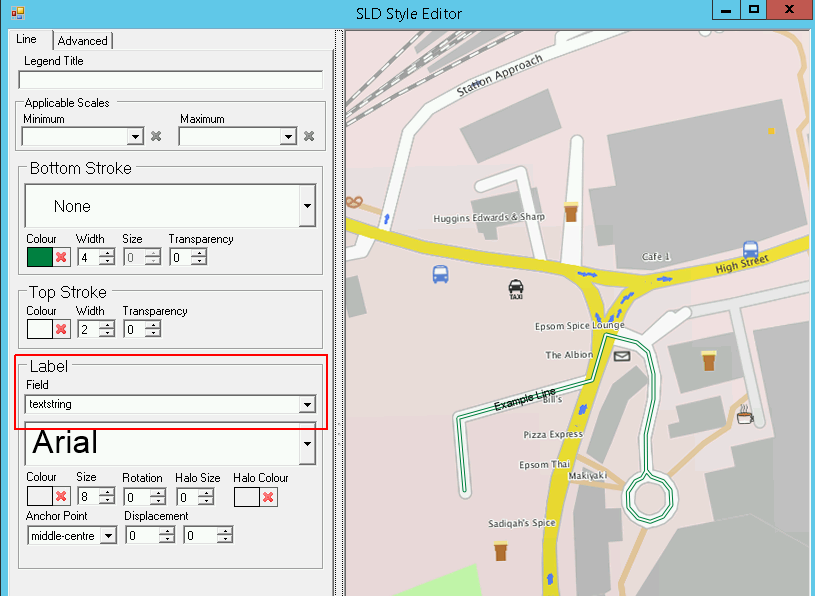
Next click the Modify Style button and pick a style for your Layer. If you wish the text from the original Annotation to be displayed then pick the textstring field as the Label field.e.g.
When creating your Layer to display the Annotation Line information you may wish to exclude the Annotation Text entries which show up as lines. If this is the case then you just need to add the following to your select statement:
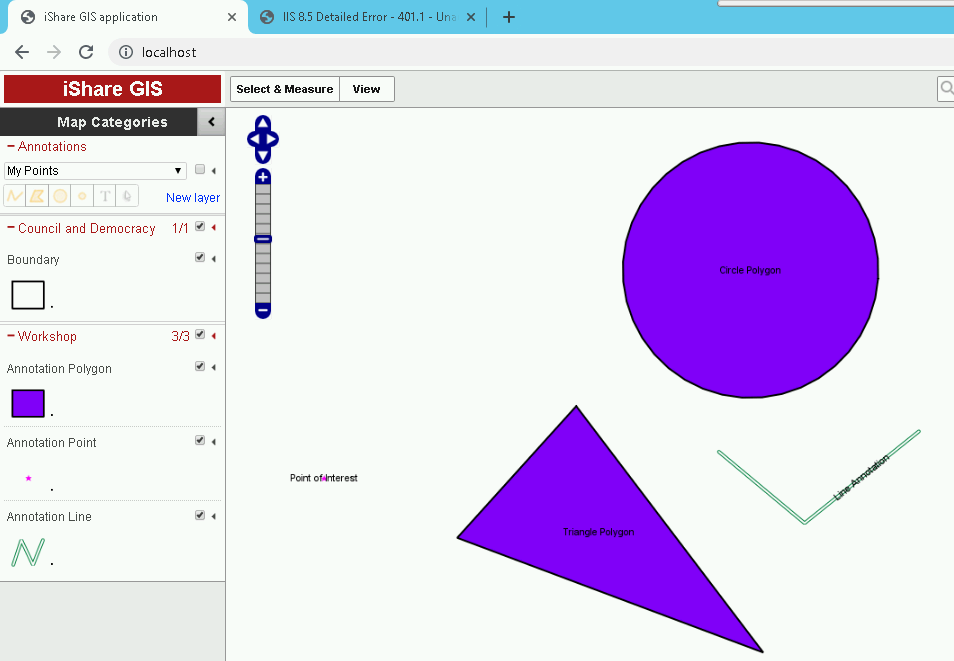
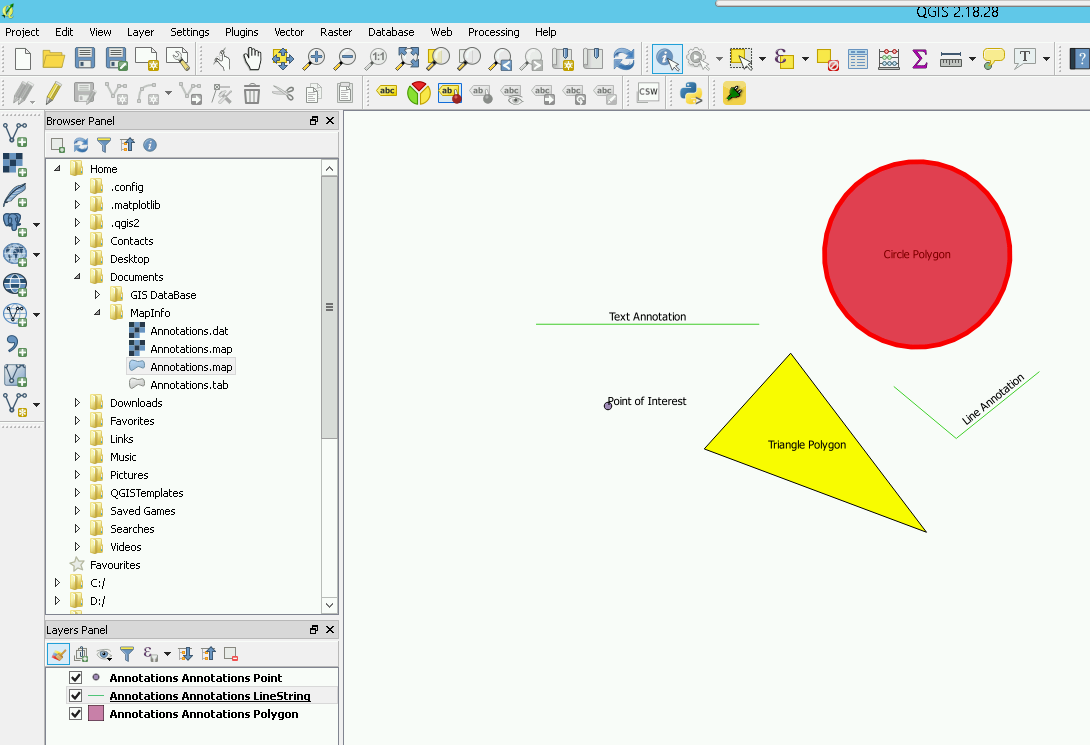
The above screenshot shows Point, Polygon (both circle and polygon) and Line Annotations extracted from an Annotations Layer (Text Annotations have been excluded) using a Blank Base Map as the background.
Step 4 - Create Annotation Features MapInfo .TAB file
Here we will use the Spatial Data Transformation task to create a MapInfo .tab file of all the Annotation features, regardless of geometry type. This is because MapInfo supports multiple geometry types.
- In Studio Workflow select to create a Task either under the Unassigned tasks or under a specific Job if you have created one for this purpose.
- Select the Spatial Data Transformation type.
- Output is MapInfo and specify a Filename e.g. C:\Users\astun\Documents\MapInfo\Annotations.tab.
- This time don't tick the Force Geometry.
- Tick Show expert mode and past the following in the Additional parameters. The following will extract ALL Annotations if you only want those for a specific Annotation Layer then add "AND a.layerid = n" where n is the layerid you wish to extract to the end of the code.
- Run the Task to create and populate the MapInfo .TAB file.
- Save your changes.
As Annotation Text is created as Line geometry, if you don't want these to be included in your .TAB file just add the extra check for ms_style_symbol NOT LIKE 'text' e.g.
Here is the output MapInfo.tab file opened in QGIS with labelling set to use the textstring field showing each type of Annotation geometry.