Customise Feature Highlighting in iShare GIS
Overview
In iShare GIS, if you have used one of the Selection tools to make a selection on the map, the Information Browser then displays the results. If you hover over an entry in the Information Browser with your mouse the specific feature will be highlighted on the map. The feature will be highlighted using the default style for the specific Geometry Type for the feature be it Polygon, Line or Point. From iShare V5.6.2 you now have the ability to customise, either the default feature highlighting or the individual feature highlighting for a specific Layer.
Step-by-step guide
Customising Feature Highlighting for a specific Layer
- Navigate to the D:\Astun\iShareGIS\n.n\WebApps\WebService\SLD\selection folder where you will see three .xml files, one for each of the Geometry Types.
- Copy one or all of the files, depending upon the Geometry Type of the Layer whose Feature highlighting you wish to customise, into the custom\SLD\selection folder e.g. D:\Astun\iShareGIS\n.n\WebApps\WebService\custom\SLD\selection. We recommend copying the file(s) to the custom folder before making any changes to prevent upgrading to a newer version of iShare reversing your changes.
- Now open the xml file in a text editor such as Notepad++
- We are now going to customise the feature highlighting for a specific Layer.
- Copy the entire <NamedLayer> entry and paste it below the existing default entry {layer_name}. In the following example we are changing the Polygon highlighting but the same applies to Line and Point e.g.
Polygon Highlighting
 <StyledLayerDescriptor version="1.0.0">
   <NamedLayer>
    <Name>{layer_name}</Name>
    <UserStyle>
      <Name>{layer_name}</Name>
      <FeatureTypeStyle>
        <Rule>
          <Name>.</Name>
          <PolygonSymbolizer>
            <Fill>
              <CssParameter name="fill">#00FF00</CssParameter>
              <CssParameter name="fill-opacity">0.25</CssParameter>
            </Fill>
            <Stroke>
              <CssParameter name="stroke">#00FF00</CssParameter>
              <CssParameter name="stroke-width">2</CssParameter>
              <CssParameter name="stroke-opacity">1</CssParameter>
            </Stroke>
          </PolygonSymbolizer>
          <Filter xmlns:gml="http://www.opengis.net/gml">
            <PropertyIsEqualTo>
              <PropertyName>{unique_field}</PropertyName>
              <Literal>{unique_id}</Literal>
            </PropertyIsEqualTo>
          </Filter>
        </Rule>
      </FeatureTypeStyle>
    </UserStyle>
  </NamedLayer>
  <NamedLayer>
    <Name>{layer_name}</Name>
    <UserStyle>
      <Name>{layer_name}</Name>
      <FeatureTypeStyle>
        <Rule>
          <Name>.</Name>
          <PolygonSymbolizer>
            <Fill>
              <CssParameter name="fill">#00FF00</CssParameter>
              <CssParameter name="fill-opacity">0.25</CssParameter>
            </Fill>
            <Stroke>
              <CssParameter name="stroke">#00FF00</CssParameter>
              <CssParameter name="stroke-width">2</CssParameter>
              <CssParameter name="stroke-opacity">1</CssParameter>
            </Stroke>
          </PolygonSymbolizer>
          <Filter xmlns:gml="http://www.opengis.net/gml">
            <PropertyIsEqualTo>
              <PropertyName>{unique_field}</PropertyName>
              <Literal>{unique_id}</Literal>
            </PropertyIsEqualTo>
          </Filter>
        </Rule>
      </FeatureTypeStyle>
    </UserStyle>
  </NamedLayer>
</StyledLayerDescriptor>
- Find the Layer in Studio that you wish to customise and copy the Layer name e.g. Countries in the following example.
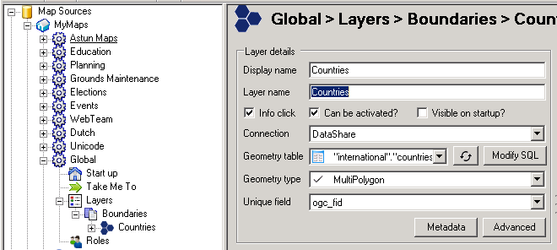
- Paste the copied Layer name into the two {layer_name} entries in the new <NamedLayer> section.
- Now change the fill and stroke colour, opacity and width as required. We have changed both fill and stoke colours to red (#FF0000) in our example e.g.
Customised Countries Layer
<StyledLayerDescriptor version="1.0.0">
  <NamedLayer>
    <Name>{layer_name}</Name>
    <UserStyle>
      <Name>{layer_name}</Name>
      <FeatureTypeStyle>
        <Rule>
          <Name>.</Name>
          <PolygonSymbolizer>
            <Fill>
              <CssParameter name="fill">#00FF00</CssParameter>
              <CssParameter name="fill-opacity">0.25</CssParameter>
            </Fill>
            <Stroke>
              <CssParameter name="stroke">#00FF00</CssParameter>
              <CssParameter name="stroke-width">2</CssParameter>
              <CssParameter name="stroke-opacity">1</CssParameter>
            </Stroke>
          </PolygonSymbolizer>
          <Filter xmlns:gml="http://www.opengis.net/gml">
            <PropertyIsEqualTo>
              <PropertyName>{unique_field}</PropertyName>
              <Literal>{unique_id}</Literal>
            </PropertyIsEqualTo>
          </Filter>
        </Rule>
      </FeatureTypeStyle>
    </UserStyle>
  </NamedLayer>
   <NamedLayer>
    <Name>Countries</Name>
    <UserStyle>
      <Name>Countries</Name>
      <FeatureTypeStyle>
        <Rule>
          <Name>.</Name>
          <PolygonSymbolizer>
            <Fill>
              <CssParameter name="fill">#FF0000</CssParameter>
              <CssParameter name="fill-opacity">0.25</CssParameter>
            </Fill>
            <Stroke>
              <CssParameter name="stroke">#FF0000</CssParameter>
              <CssParameter name="stroke-width">2</CssParameter>
              <CssParameter name="stroke-opacity">1</CssParameter>
            </Stroke>
          </PolygonSymbolizer>
          <Filter xmlns:gml="http://www.opengis.net/gml">
            <PropertyIsEqualTo>
              <PropertyName>{unique_field}</PropertyName>
              <Literal>{unique_id}</Literal>
            </PropertyIsEqualTo>
          </Filter>
        </Rule>
      </FeatureTypeStyle>
    </UserStyle>
  </NamedLayer>
</StyledLayerDescriptor>
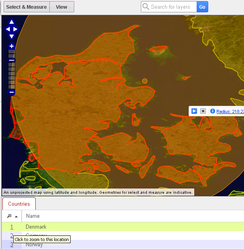
- Save your changes and refresh the browser if you already have iShare GIS open.
- See Denmark outlined in Red.
Changing the Default Feature Highlighting
- Navigate to the D:\Astun\iShareGIS\n.n\WebApps\WebService\SLD\selection folder where you will see three .xml files, one for each of the Geometry Types.
- Copy one or all of the files, depending upon the Geometry Type whose Feature highlighting you wish to customise, into the custom\SLD\selection folder e.g. D:\Astun\iShareGIS\n.n\WebApps\WebService\custom\SLD\selection. We recommend copying the file(s) to the custom folder before making any changes to prevent upgrading to a newer version of iShare reversing your changes.
- Now open the xml file in a text editor such as Notepad++
- Change the entries for the {layer_name} such as the fill and stroke colour, opacity and width as required. We have changed both fill and stoke colours to red (#FF0000) in our example e.g..
Changing the Default entries
<StyledLayerDescriptor version="1.0.0">
  <NamedLayer>
    <Name>{layer_name}</Name>
    <UserStyle>
      <Name>{layer_name}</Name>
      <FeatureTypeStyle>
        <Rule>
          <Name>.</Name>
          <PolygonSymbolizer>
            <Fill>
              <CssParameter name="fill">#FF0000</CssParameter>
              <CssParameter name="fill-opacity">0.25</CssParameter>
            </Fill>
            <Stroke>
              <CssParameter name="stroke">#FF0000</CssParameter>
              <CssParameter name="stroke-width">2</CssParameter>
              <CssParameter name="stroke-opacity">1</CssParameter>
            </Stroke>
          </PolygonSymbolizer>
          <Filter xmlns:gml="http://www.opengis.net/gml">
            <PropertyIsEqualTo>
              <PropertyName>{unique_field}</PropertyName>
              <Literal>{unique_id}</Literal>
            </PropertyIsEqualTo>
          </Filter>
        </Rule>
      </FeatureTypeStyle>
    </UserStyle>
  </NamedLayer>
</StyledLayerDescriptor>
- Save your changes and refresh the browser if you already have iShare GIS open.
, multiple selections available, Use left or right arrow keys to navigate selected items