My Maps Configuration
- Kim Stimpson
- Simon Chapman
Layer and Map Source Management
Copy a Map Source
The first step that you need to take when configuring My Maps Map Sources is to either add an existing map source or create a new a new one. You can do this by right clicking on the My Maps root icon  and selecting either:
- Create MapSource - to copy an existing entry and simply change the required entries. You will need to give a name to your new Map Source file e.g. Education.xml which should reside under the D:\Astun\iShare\n.n\WebApps\WebService\config folder. Select the entry you wish to copy and click OK. You will be prompted to enter the Name of the new Map Source xml file. Enter the new name and click Save. Then you can make the changes you require.

- Import MapSource - This option allows you to import an existing Map Source. Say you had created a Map Source for iShare Maps and you wanted to use the same on for iShare GIS then you would use this function.
This name must NOT contain spaces as this can cause issues with navigation to Map Sources, Printing and Feature Editing.
If Workspaces / Shared Services have been configured for your iShare installation then, when you add a Map Source in Studio, you will also need to add it to the iShareMaps.xml file - see Override Configuration & MapSource Settings for details.
Copy a MapServer .MAP file
When you Import or Create a Map Source you give the Map Source a new name but the underlying .MAP file remains the same. This can cause issues as, if you add Layers etc. to the .MAP file, they will appear in both Map Sources. We suggest that when you Import or Create a Map Source you also copy the .MAP file and use the copied file in your new Map Source.
Navigate to the mapserver .map files folder (normally in iShareData\LIVE\_Mapserverconfig), and copy and rename.
Note that there are also example mapserver files in iShareData\Astun\_Mapserverconfig
Copy Layers between MapSources
- Navigate to the folder where the Map Source files are held, for example Astun\iShare[GIS]\LIVE\WebApps\WebService\Config\mapsources\ and locate and open both Map Source XML files in a text editor such as Notepad++.
- Copy and Paste the whole of the
<Layer>element from the Source to the Destination Map Source - Save the amended Map Source.
Configure Map Source in Studio
Any Map Source that you wish to use in My Maps, iShare Lite, iShare Solo or the iShare GIS modules, other than your BaseMaps, will need to be defined under the My Maps node.
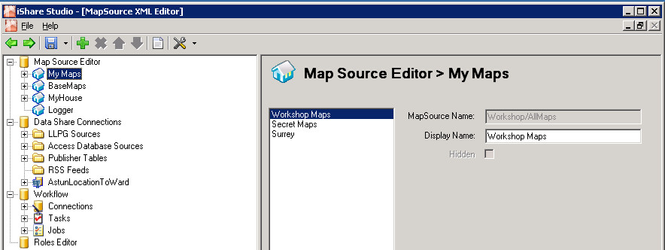
First select the entry from the list of My Maps Map Sources.
Display Name
Enter the name that you wish to appear on the tab for My Maps.
Hidden
If you have more than one Map Source defined under the My Maps node you will see a Hidden checkbox. This can be used to hide specific Map Sources from My Maps. For instance if you needed to define a Map Source to be used in a specific web page using iShare Lite or iShare Solo or a Map Source for the iShare GIS module then you would not necessarily wish to make this for public use via My Maps. In this case you would check the Hidden entry.
If you expand the My Maps node you will see each configured My Maps Map Source. Expand an individual My Maps entry to configure other areas such as: