Configure NHS Choices Classic Layers
- Kim Stimpson
Once you have downloaded the NHS Choices data that you require and updated the .MAP file you will be able to add your NHS Choices Layer Group and Classic Layers via iShare Studio.
- Create the "NHS Choices" Layer Group
- Create the individual Classic Layers for each of the NHS Choices types you wish to display.
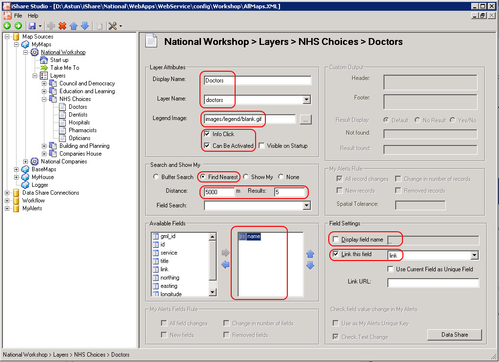
Layer Attributes
Display name
This will be displayed on the layers panel within the web page e.g. Doctors.
Layer name
Select the corresponding map file layer from the drop down list, e.g. doctors.
Legend Image
This needs to be set to images/legend/blank.gif (which is the default setting).
Info Click
This needs to be 'ticked' to enable the Information 'pop up' window to be displayed.
Can Be Activated
This needs to be 'ticked' (this allows the user to 'toggle' the layer on/off ).
Search and Show My
Find Nearest
Select this radio button as this will search for the nearest results/ services to the user's entered address.
Distance
Enter the distance, in metres, to be searched from the chosen location e.g. 5000 (this will return the nearest results within 5000 meters).
Results
Enter the number of nearest results you wish to be highlighted e.g. 5 (in this case the nearest 5 results will be highlighted, although all results will be returned)
Available Fields
As a minimum the name field should be selected, so the Information pop up window will at least be populated with the Doctor's/ Dentist's etc. name.
Field Settings
To change the field settings first select the field from this list e.g. name in the above screenshot.
Display field name
This should preferably be 'un-ticked' (when the 'name' field from the 'Available Fields' is selected). This will stop the word "name" appearing in the browser pop up window.
Link this field
This should be 'ticked' and the link field should be selected from the drop down menu. This will create a link within the pop up window, e.g. for the individual Doctors surgeries.