Layer Fields and Field Settings
Click on a Layer in the tree and you will be able to configure the fields that you wish to be displayed to the user at the bottom of the dialog. The options are slightly different between Standard and Classic Layers e.g.
| Standard Layer | Classic Layer |
|---|---|
The following image shows the Field Settings from v5.6.2. The functionality has remained but the interface has been changed to make it more intuitive.
Image below shows Field Settings prior to v5.6.2
|
|
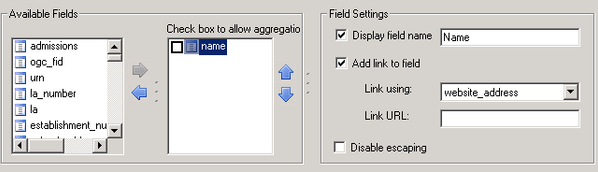
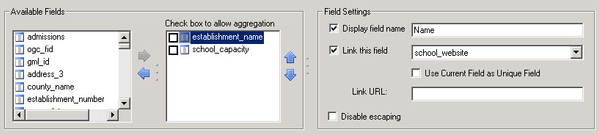
Available Fields
Here we need to define the information about the field names from the layer that are to be displayed to the user.
The list of available field names for the selected layer is displayed in the left hand list; you may then select an entry and click on the  arrow to enable this field to be displayed to the user. This will then move the entry to the list on the right hand side. To remove an entry from the list to be displayed select it and click on the
  arrow.
If the field name is 'ref' or 'id', info click will fail. To avoid this, rename the field in the source data, or use 'SELECT ref as reference' in the .map file or SQL selection to change the field name on the fly.
Check box to allow aggregation
This is only displayed for standard Layers and allows you select the field(s) you wish to aggregate.
If you check to aggregate more than one field then you will need to click the Advanced button for the Layer to define the default.
Field Settings
Display field name
This entry allows you to enter a different description for the field to be displayed to the user.
- The Display field name must not start with a number and can only contain alphanumeric characters, underscore, hyphen or spaces. Maximum length 32 characters.
- This name MUST be a UNIQUE within this layer otherwise the Info click will not work in My Maps.
- If the field name matches the Display field name, ignoring case (e.g. field name = 'test', Display Name = 'Test'), then the field name will be used in the iShare user interface (e.g. 'test'). To avoid this, put an underscore at the beginning of the Display field name (e.g. '_Test'). This will show 'Test' in the iShare user interface.
Add link to field
This specifies whether or not hyperlinks are shown in the Results panel. These hyperlinks are defined in the Link using and / or Link URL. If no field is currently linked then when selecting Add link to field for the first time after starting Studio, then Link using will be set to the current field.
Prior to v5.6.2 this was called Link this field.
Link using
If you pick a field from the list then it will either be used as the URL (if the Link URL is left blank), inserted in place of the {0} in the Link URL or appended to the end of the Link URL if no {0} defined. The Link using drop-down list now supports auto-complete and is sorted in alphabetical order to assist with finding the correct field.
Autocomplete behaviour
The typed characters for auto-complete are not shown to the user and typing behaviour depends on the speed of key presses, e.g. typing p, o, s will select a field beginning {[pos}} (like postcode), but pressing p (pause) o (pause) s will select the first field beginning with s. Pressing s (pause) s pause s will select the third field beginning with s, assuming there is one - if not, then the selection loops round to the first field.
Link URL
Enter the URL you wish to use as a hyperlink in the Results panel. If you have picked a Link using field then, unless you have entered the parameter {0} the value of the field will be appended to the Link URL.
There are various ways to setup links with iShare e.g.
- If URLs are stored in the link field as www.isharemaps.com then this should read http://{0}
- If you wish to embed values within a URL then you can do this e.g. http://www.isharemaps.com/atest{0}/another page
- If you have a single page for multiple features (i.e. you don't really want to append the value but iShare will do this automatically) then the following will add a bookmark http://www.isharemaps.com/#{0}. As there is no bookmark on the page it will ignore the value.
- This scenario is the same as the last but if you want to bookmark into a specific location in a page http://www.isharemaps.com/pagename.html#{0}
- Also linking back on itself (i.e. use current field ticked) normally http://www.isharemaps.com/page.html?featurename={0}
If your Link URL contains a vertical bar “|” then this will need to be replaced by ##vbar##.
Disable escaping
This entry allows the user to decide whether MapServer should escape the field value or not i.e. leave as is. (from v5.4.14). For instance if this is ticked it will render the HTML in the My House page rather than displaying the raw HTML. For the uninitiated escaping means converting characters like the following in HTML:
| Character | Escaped |
|---|---|
| < | < |
| > | > |
| & | & |
Use Current field as Unique Field
From v5.6.2 this has been removed. If you wish to use the currently selected field as the unique field to be inserted in place of the {0} in the Link URL then check this box.
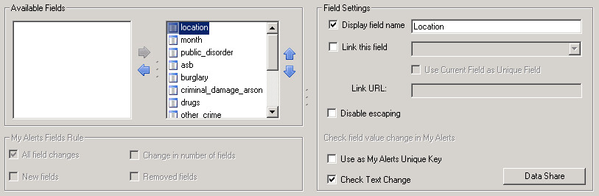
MyAlerts Fields Rule
These rules are only available for a My House Classic Layer if My Alerts has been configured.
All field changes
If checked no My Alerts rules will be applied to the record and changes to the number of fields within the record, if a new field is added to the record or if an existing field is removed from the record will trigger an alert. E.g. a new field is added from the left hand list to the right hand list in the Available Fields. If you uncheck this entry then the other three entries become enabled.
Change in number of fields
If you check this entry then an alert will only be triggered if the total number of fields within the record changes.
New fields
If you check this entry then an alert will only be triggered if a new field is added to the record.
Removed fields
If you check this entry then an alert will only be triggered if an existing field is removed from the record.
Check field value change in My Alerts
These rules are only available for a My House Layer if My Alerts has been configured. These settings relate to the individual field entries in the right hand panel of the Available Fields. First select a field and then make the required changes to the entries.
Use as My Alert unique key
Check this entry if you wish to use this field as the Unique key for My Alerts. E.g. Planning reference for a Planning record. This will mean that you have a more accurate way of checking whether or not data has changed for an individual record. If you have specified a field as a Unique Key then you will not be able to check for text changes.
You do not have to set a field as a Unique Key.
Check Text Changes
Check this entry if you wish to trigger an alert if information in this field changes e.g. the Head of the local school changes. If you do not have a Unique Key set for the record then any change to a record will be assumed to be a new entry; if a Unique Key has been set then a change will be reported as a change.
Data Share button
Clicking this button allows you to include information (fields) from Data Share. This is only available for Classic Layers. Please refer to the topic Including fields from Data Share for details.