Configure Connection to an Oracle database
Studio uses the Oracle 32-bit OLE DB provider to transfer non-spatial data to iShare. This provider is available as part of the Oracle client installation. If running a custom Oracle client installation the Oracle Advanced Security component must be installed as well for the Oracle OLE DB provider to work.
Spatial data is transferred using OGR's Oracle support and the Oracle client libraries.
There are various steps that you need to perform in order to create a Data Share connection to an Oracle database.
Setting up the TNS Listener
In order to connect to ORACLE, it is necessary to configure the TNS Listener in order to pass server/database details to Studio. The ORACLE server itself should already be set up with similar details the other side of the connection: if not, you will need to get the SysAdmin for the ORACLE server to set these up before attempting a connection (otherwise the ORACLE server will simply ignore the connection attempt).
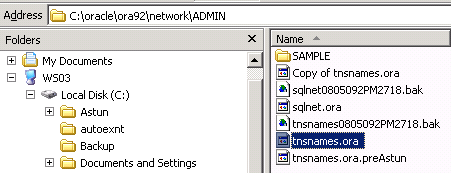
The file tnsnames.ora - which contains these configurations - is generally located in the ADMIN directory of the oracle-client installation - as shown opposite. |
|
Add the TNS details pertinent for the ORACLE connection - as shown below. These details need to be supplied by the SysAdmin for the ORACLE server |
|

Testing the Connection
Before configuring Studio, it is a good idea just to test the connection first to make sure that you can access not only the server, but also the tables/fields you will be accessing.
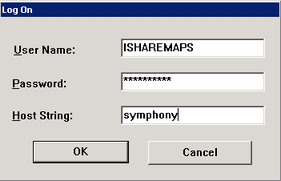
This example uses SQL+ - but any other SQL client will do just as well. Enter the connection details for ORACLE (Case-sensitive) |
|
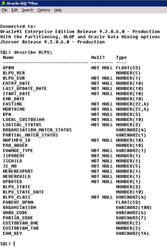
Once connected (providing everything is ok), enter an SQL query to see if you can interrogate the database. If all is working correctly, then you will receive results similar to those shown opposite. |
|
Configuring Studio
Once the connection to ORACLE has been configured, connect to the tables in Studio as follows:
- With the Data Share Connections selected right click and select Add DataSource from the context menu.
- Select Standard as the DataSource Type
- Click on the Configure Source Database button.
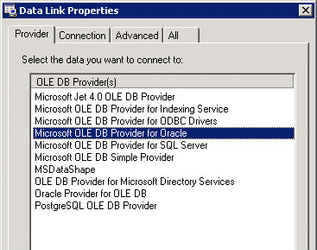
- Click on the Provider tab and select the correct driver for ORACLE e.g.
- In the Connection tab, enter the connection details for the ORACLE server.

- Once entered, use the Test Connection button to test the connection.
- Enter a Name and Display Name for your Data Share connection.
- Click on the Construct SQL button and select the table from the top pull-down and tick the appropriate boxes in the list of fields for that table underneath.
To add a connection to another table simply repeat the above Studio steps.